New MacBook Air’s (Late 2010) Review and Benchmarks

It would be easy to dismiss the new MacBook Air as slow due to its apparently slow processor but if you did, you’d be wrong.

Offerings

The new Air comes in 4 base models.

$994 – 11.6″ 1.4GHz CPU 64GB storage

$1194 – 11.6″ 1.4GHz CPU 128GB storage

$1294 – 13.3″ 1.86GHz CPU 128GB storage

$1594 – 13.3″ 1.86GHz CPU 256GB storage

What’s so special about it?

The obvious impressive feature of the Air is the size being extremely thin and weighing 2.3 lbs (11.6″ model) or 2.9 lbs (13.3″ model). But what really makes it worth having is what’s under the hood. The CPU is not cutting edge, maxing out at just 2.13GHz. However, the graphics and hard drive are so much faster, this more than offsets the CPU for most users.

Graphics (GPU)

The 320M graphics are about 2-3Xs faster than the previous 9400M. Graphics performance is becoming more and more important since apps like iPhoto and the Mac OS itself do a lot of animation and tasks that can be run on the GPU. The latest version of Mac OS X actually has the ability to run tasks that would normally be on the CPU on the GPU instead. Programs do have to be developed for that but it is something Apple is heavily pushing developers to do.

Disk Storage

The hard drive actually isn’t a hard drive. It has flash storage, much like that found in the iPhone or iPad. Flash storage is typically significantly faster but also very expensive. The price points that Apple has been able to create with this kind of fast storage is quite impressive. Any task that involves the disk will be massively faster than any other MacBook Apple offers. This is perhaps the most impressive feature of the new Airs. There are various hard drive tasks but most will fall in the range of 2-6Xs faster than a hard drive found in other MacBooks.

Screen

These MacBook Air’s have a much higher ppi (pixels per inch) than the other MacBooks. The higher the ppi, the sharper things look. The 13.3″ Air actually has the same resolution as the 15.4″ MacBook Pro. That means if you had them side by side, they could show the exact same content on the screen at the same time though the Air’s would appear slightly smaller since the pixels are squeezed into a smaller screen.

One thing I immediately noticed on the screen was that it seemed to be less reflective than the other MacBook’s. This is a photo of the Air 13.3″ next to a MacBook Pro 15.4″ with the screens pointed at the same set of windows.
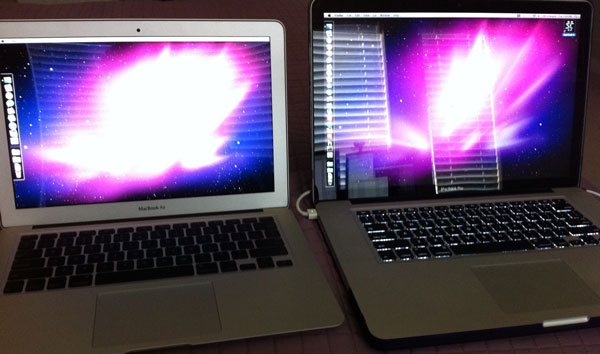
The screen is clearly less reflective. This may be because the Pro has that sheet of glass across the whole area and the Air does not. Whatever the reason, I far prefer a less reflective screen.

What is it no good at?

Multi-threaded CPU intensive tasks are definitely the biggest weak point. In this regard, the MacBook Pro i5 is about twice as fast. If you do a lot of this, you may not be satisfied with the Air. If you don’t know what multi-threading is, then this likely won’t be a problem for you. An example of this is making digital backups of your DVDs with Handbrake. Handbrake is multi-CPU optimized and will perform much better on any other Mac.

Flash storage is typically smaller. The $999 MacBook Air has just 64GB storage. The 11.6″ can have up to 128GB and the 13.3″ starts at 128GB and goes up to 256GB. If you don’t plan on storing lots of photos or movies, the 64GB or 128GB should not be a problem.

Real World

In informal real world feel tests, typical tasks like browsing, email and application startup don’t feel slow at all. Safari and Mail load on one bounce in the dock. iPhoto feels quite fast, probably because loading all those photos from the faster storage really helps. For typical day to day use of a normal user, this MacBook Air is not only decent, but it feels faster than others just because of the flash drive storage.

Benchmarks

We benchmarked the MacBook Air 13.3″ 2.13GHz Core 2 Duo which is the fastest model. The overall Xbench score was 180. In comparison, a previous generation MacBook Pro 15.4″ 2.66GHz Core 2 Duo gets about a 137 and current generation MacBook Pro i7 gets about 174. The Xbench overall score tries to take every type of performance into account. This doesn’t mean the Air is faster than an i7. At multi-threading, the i7 is more than twice as fast. But overall, the Air is competitive because of the big gains in disk speed and graphics. The Xbench disk score was 238 compared to other MacBooks which get around 55 at best. It is this disk score that really raises the overall score.

Xcode is a development program for creating software for the Mac or iOS.  I’ve heard a lot about how this Air still couldn’t possibly be used by developers.  Well, we tested a rather large project consisting of over 20K lines of code to compile and about 15MBs of resources (images and data files).  When building a project in Xcode, it has to do both file copying (disk intensive) and code compiling (CPU intensive).  Building this project took 15s on a quad core Mac Pro with software raid drives and 33s on a MacBook Pro 2.66GHz Core 2 Duo.  The 2.13GHz Air was able to do it in 24s, much faster than the MacBook Pro.  This was a surprise but shows just how the old hard drives cause a slowdown of all the tasks in building the project.

Conclusion

All previous MacBook Air’s were higher priced and underpowered. They had much slower CPUs even though they were the same clock speeds. They had either slow hard drives or insanely expensive SSDs (solid-state drives) and subpar graphics. Apple clearly worked hard to make a product that could truly be a potential system for almost anyone.

The 11.6″ MacBook Air should be an attractive option at less than $1,000.  If you want small, this is it.  It is just 1.4GHz but for most uses, this should be fast enough. The $1300 model is probably the best value, offering you enough storage with 128GB and a much faster CPU at 1.86GHz.

AT&T 3G MicroCell Review and Recommendations

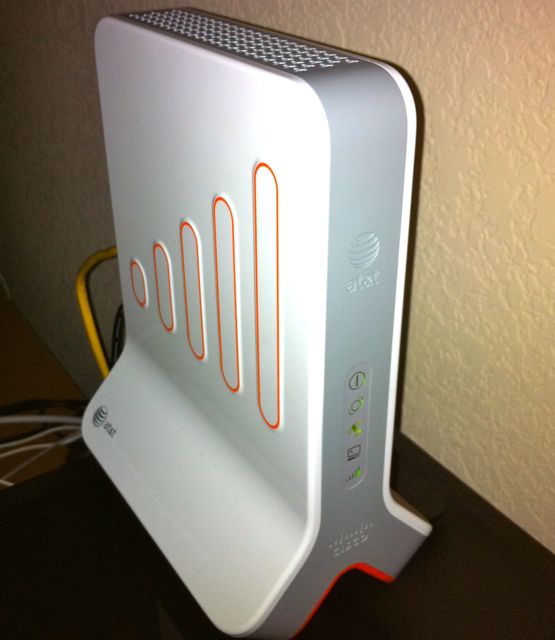
The MicroCell is an interesting product. Some believe it is a product filling holes in a carrier’s network that shouldn’t exist. No carrier has blanket coverage and often even when there is coverage, it is worse indoors so it is nice that products like this do exist.  For $150, you can pick up an AT&T MicroCell from any AT&T store.  This is a cheaper option than some alternatives and worth consideration if you have little coverage at home or work.

Setup

Account setup is rather simple and done through a website.  You provide your address and phone numbers and that’s it.  You are limited to 10 phone numbers that can work through a MicroCell.  The good news is that it is locked down by phone numbers so your neighbor can’t use it.  Your address info is verified by GPS in the MicroCell during startup.  Unfortunately, this means the device needs to be near a window so it can get a GPS signal.  This is the oddest thing about it but apparently a requirement by the FCC.  If the GPS light does not come on, you need to move it closer to a window.  In some cases, you may need to try various windows at your house until you finally are able to get GPS.

Once you get GPS and are connected to your Internet, you can move the device as long as it doesn’t lose power.  This might be easy if are just relocating it in the same room.  If you are moving to an area with no windows, you’ll need a battery backup solution.  A cheap good option is the Tripp Lite Compact UPS.  Once you get GPS by a window, you can unhook the ethernet and move the MicroCell and UPS (uninterrupted power supply) wherever you like.  Of course, if you ever lose power for longer than your UPS can last, you’ll have to go through that whole process again to set it up.  This battery backup approach can make sense though because placement is very important.

Performance

AT&T claims a 40 ft range.  This is pretty decent and works out to an area of about 5,000 square feet, even more if you have 2 floors.  You’ll drop about 1 bar of coverage per major obstacle (like a wall) so to cover a whole house, you’ll want to put the MicroCell in the most central location.  Unfortunately, central often means no windows, hence the need for the UPS approach.

Even if you’ve got 5 bars and are sitting right next to the MicroCell, your call quality might be awful if your Internet isn’t good.  This is often the cause of any VoIP (voice over Internet protocol) issues and everyone’s assumption that their Internet is good.  To test the VoIP quality of your Internet, visit this VoIP test site.  If you don’t do well on those tests, you shouldn’t consider any VoIP products.

Assuming you’ve got good Internet and good bars, the MicroCell performance is very good.  You’ll know you’re connected because your phone will say something like AT&T M-Cell instead of just AT&T.  If you’re far from the MicroCell or have many walls between it and you, your performance may suffer so be sure to place it near where you expect to make most calls.  If you’re heavily using your Internet, streaming a video for example, your call quality may suffer if you don’t have your router setup properly.

Router Optimization

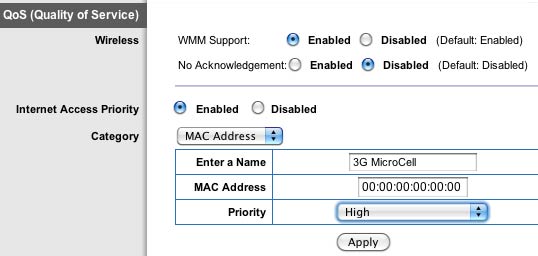
The MicroCell can go between your router and DSL/Cable modem but additional routers is rarely a good thing.  We recommend you hook the MicroCell up to your router so it can plug in anywhere on your network. We don’t recommend the use of a wireless bridge as wireless can be too sporadic for VoIP.  To optimize MicroCell performance, it should be given high priority in your router’s QoS (Quality of Service).  The MicroCell MAC address is on the bottom of the device.

Alternative

Before the MicroCell, the best alternative was the zBoost YX-510 Cell Phone Booster.  This is around $300 and requires that you have some signal near a window or in an attic.  Coaxial cable is run from an antenna to the zBoost repeating antenna.

Conclusion

If you’ve got poor Internet but some outside signal, the cell phone booster is your best bet.  If you’ve got good enough Internet, the MicroCell is a cheaper and superior option.  You may not like having to pay for such a device but it is a one time fee that should simply make your AT&T phones work at home.

10 Fixes for Overheating Laptops

Many PC laptops are poorly designed, causing them to overheat and turn off automatically to keep from becoming damaged. Here are a few possible fixes:

1. Remove Dust

Dust often forms around fans and air vents, reducing airflow and cooling. Start with a vacuum cleaner to pull out loose dust. Then blow out the remaining dust with a can of compressed air.

2. Keep Vents Open

Be sure to never cover the fans and air vents. The small holes under the laptop are needed for the components to properly cool. Placing a laptop on a pillow or bed will smother the vents and stop airflow. If you do use the laptop on a bed, carpet, etc, at least place it on a board or other smooth surface so that the laptop can use the designed airflow.

3. Raise the Laptop

Raise the laptop to allow more air to flow underneath. Don’t do this in a way that covers the air vents. For example, four rubber furniture raisers bought a hardware store will cheaply raise a laptop. For more cheap options, see the Lifehacker Top 10 DIY Laptop Stands.

4. Add Active Cooling

For more money, you can buy a notebook cooling pad such as the Targus Lap Chill Mat or Cooler Master Notepal U2. These raise the laptop and have fans which move air under the laptop.

With one customer, I needed to get the data off of a quickly overheating laptop so I placed it onto trays of ice. I placed a sheet of plastic over the ice to reduce humidity seeping up to the laptop. It wasn’t a long-term solution but was able to keep the laptop running for a few hours.

5. Download BIOS and Software Updates

Typically available from the laptop manufacturer, BIOS and OS driver updates can fix CPU and fan control problems.

6. Configure the BIOS

Check to see what BIOS options exist for the CPU and GPU. You typically get into the BIOS by clicking F1, F2 or ESC when you first turn the computer on.  Sometimes there are options to underclock the CPU or step down the processors.

Fan speeds and temperature alarms can sometimes also be set in the BIOS.

7. Configure Windows Power Options

Within Power Options (Control Panel – Power Options), you can set the laptop to run using less power for both the CPU and graphics card. This will slow down the computer but also lower its heat.

8. Install Monitoring Software

Speedfan is free Windows software allowing you to see the temperature of components. Knowing the CPU temperature can be helpful when trying to improve cooling. Depending on the system, Speedfan might be able to control and modify the fan speed.

9. Fix the Thermal Compound

The thermal compound between the CPU and heat sink is often poorly applied during manufacture. If you want to fix an overheating CPU and are adventurous, you can open the laptop, remove the CPU, clean it and the heat sink, apply new thermal paste, and put everything back together. This is not a simple process, even for people who do it regularly. But it can permanently fix some overheating computers.

10. Internet Search For Your Laptop Model

Particular laptop models are typically susceptible to the same problems. A recent customer has a Gateway M1625, commonly afflicted with overheating on the left side due to poor CPU thermal paste. Many Sony models were recently identified as having an overheating problem that Sony is fixing through software. A fix for your laptop might be found with a quick Internet search.