Mac Software Striping RAID Performance

The Mac OS includes software RAID options.  Using the striping option, you can double your storage and greatly improve your read/write performance.  But what is the true performance gain and is it worth doing?
Mac Pro

What you need

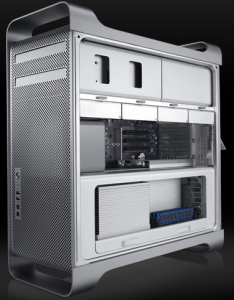
First, you need a Mac capable of holding at least 2 drives.  This is actually a problem for most Macs.  Only the Mac Pro is capable of that off the shelf.  The Mac Mini can be hacked to do so but it involves removing the DVD drive and soldering in a 2nd hard drive.  The system I used in this test is the latest entry-level Mac Pro from early 2009.

Second, you need another hard drive.  The Mac Pro can actually hold 4 but for the purposes of this test, I’m only adding 1. This Mac Pro comes with a 640GB Western Digital Caviar Blue so I purchased another identical to that.  It is best to have 2 identical drives when doing striping so that both drives can be fully used.  If you’re looking for Mac Mini drives, we recommend the 500GB Western Digital Scorpio Blue.

Backup original drive

In order to add the 2nd drive, you’ll need to fully backup your first drive so that you can restore it later.  When creating a RAID setup, the drives will be wiped clean.  If you already have a time machine backup, you can do a restore from that but I prefer using Disk Utility to do a backup and restore because it can create a fully bootable 100% identical backup that you can then restore from Disk Utility off of a Leopard boot disc.  Disk Utility doesn’t word things very well.  Both a backup and a restore are both under the Restore tab.  When you backup, you just do a restore from your Macintosh HD to your external backup drive.  If you want the backup to be bootable, be sure it is partitioned with a GUID Partition Table scheme under Options.

Add the drive

Now that your data is backed up, you can add your new drive.  In the Mac Pro, this is the quickest and easiest hard drive addition ever.  Simply unlatch the drive holders and slide one out.  There are 4 screws already in there waiting to go into the new drive.  Then you just slide in the new drive and that’s it.  If you’re using a Mac Mini, you’ll need to follow this Mac Mini upgrade guide.
Mac RAID

Create the RAID
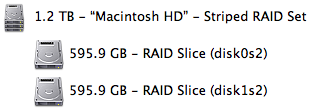
Boot up the mac off of a Leopard disc by holding down C.  Choose your language and then you’ll be able to launch Disk Utility from the top menu.  Select one of the drives and go to the RAID tab.  Enter the RAID Set Name to be the standard drive name Macintosh HD.  Then drag both of your drives to the RAID set window.  Both will show up and show the combined storage based on your RAID type.  Mirroring is for a duplicate backup.  Striping is for performance and extra storage.  You can select Create to create the software RAID and it shouldn’t take more than a few minutes.

Restore

If you did a time machine backup, you can go through the standard Leopard install and choose restore from time machine.  If you did a disk utility backup, select your new Macintosh HD volume and go to the Restore tab.  Choose your external backup drive as your source and the Macintosh HD as the destination.  If you have a lot of data, this can take several hours.  If all went well, your system should now be able to boot off your new striping RAID Macintosh HD volume.

Performance

Now that we’ve got our striping RAID, how does it perform?  Using the Xbench disk test, the drive performance has gone from a score of 73 to 112.  That’s about a 53% improvement overall.  The test uses a variety of disk usage and this striping will perform differently based on exactly how the data is being used.  The biggest benefit will be for large files.  For example, if you use a virtual machine like VMware Fusion, the virtual RAM is written and read to the hard drive when you do a suspend or resume of the OS.  The result is that with a striping RAID volume, this feels about twice as fast. Striping also combines the drives so you double the capacity.

The down side

The biggest negative is that with 2 drives required to be working, we’ve doubled the likelihood of the Macintosh HD volume failing.  If just 1 drive breaks, the whole volume is lost.  Fortunately, Apple provides time machine which gives us a reliable and effortless backup.  If you do lose a drive, you’ll need to replace the bad drive and restart the RAID set from scratch and restore.  Another downside is that because this is a software RAID, it does use a little CPU which hardware RAID would not.  But a Mac Pro hardware RAID card will set you back $700 and the CPU usage is so small, I can’t even notice it when looking at Activity Monitor.

Conclusion

If you want to massively improve your disk performance, adding a second drive and creating a striping RAID set is a great choice.  This is easy in a Mac Pro but can be done on a Mac Mini with some work.  Just be sure you always have a time machine backup running in case your RAID fails.
2009 Mac Desktop Benchmarks

The latest versions of the Mac Mini, iMac, and Mac Pro all show improvements over previous versions.  Besides a few changes in connections, physically they are relatively unchanged.  The main improvement is in performance.

With the upcoming release of the next Mac operating system, Snow Leopard, the threading performance of your Mac hardware is now more important than ever.  Snow Leopard will be more optimized for multi-threading than any of its predecessors.  The latest Mac desktops will benefit more than previous models since they outperform significantly on thread benchmarks.
The following benchmark scores were collected by the popular Xbench Mac benchmarking software.  The new desktops are all of the entry level models. For all tests, a higher score is better.

Model Thread Test UI Test Memory Test
2006 iMac Core 2 Duo 2GHz 171 257 133
2009 Mac Mini Core 2 Duo 2GHz 231 258 162
2009 iMac Core 2 Duo 2.66GHz 360 379 177
2009 Mac Pro Xeon 3500 2.66GHz 543 409 374

It should be no surprise that the Mac Pro performs the best.  The Mac Mini has always been underpowered but at least it still outperforms some previous iMac models with similar CPU.  The entry-level iMac for $1,199 posts extremely impressive results.  For half the price of a Mac Pro, the thread performance was still great.  However, the Mac Pro truly dominates in the memory test.  The newer nehalem architecture uses tri-channel RAM which is significantly faster.  Any memory intensive applications will see a big improvement on a Mac Pro.  The iMac and Mac Mini won’t use nehalem until the end of 2009 at the earliest.

It is hard to highly recommend the Mac Mini just because it feels like it should come with a faster than 2GHz processor.  For the first time though, you can hook up 2 monitors to the Mac Mini.  The iMac offers the best value by far.  It performs great and isn’t overly expensive.  If you want the best performance and money is no object, the Mac Pro is for you.  Once Snow Leopard comes out, the performance of these new Macs should increase significantly.

LCD Monitors trending towards 16:9 ratio?

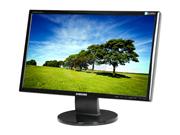
Since HD began, widescreen TVs have been 16:9 ratio in screen size. But widescreen computer monitors have always been 16:10 ratio. If you’ve got a 24″ LCD, it is undoubtedly the 16:10 ratio of 1920×1200.  But just over the last few months, a few 16:9 ratio monitors have come out and many think this will start a new trend since computers will be used for HD content more and more.

An example of this new even wider ratio is the Samsung 2343BWX 23″ LCD.  It just came out in February and has a 2048×1152 16:9 resolution.  This has 3 major advantages. The first is that if you play HD video, it can completely fill up the screen since it matches the 16:9 ratio.  The second is that if you cut the screen in half, you’ve got 2 windows of the width 1024.  This happens to be the magic width that most web developers try to build for.  The result is that you could have 2 browser windows side by side on this monitor.  The last advantage is that even though this is 1″ smaller than its 24″ older brother, the 2048×1152 resolution actually has more total screen real estate in pixels than the 1920×1200.  You cut about 4% on the height but add about 6% on the width.  Dell has gotten into this game too with the SP2309W which has essentially the same specs as the Samsung.  At Dell, the monitor is so popular it now has a 3-5 week wait if you order today.
Kindle 2 Announced

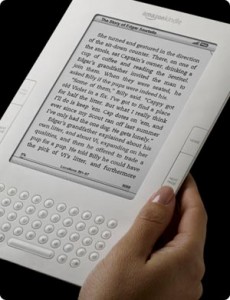
The long awaited Kindle 2 by Amazon was finally announced today.  It was just as the rumors predicted in appearance.  It has several desired improvements but a few shortcomings as well.

Shape and Size

The Kindle 2 is more attractive than the original.  The new thinner design is impressive.  The tradeoff is that the device now has a bigger footprint.  In some cases the original Kindle would fit in your purse, the Kindle 2 may not.  But the same is true for the thickness giving the Kindle 2 an advantage.  With its new thinness, the Kindle 2 can probably fit more easily into some thin pockets in a bag.  Overall, the new shape is an improvement.

Battery Life

The Kindle 2 has 25% more battery life than its predecessor.  The original Kindle had a very impressive battery life already. It is a good idea to turn off your wifi when you aren’t downloading a new book to get longer battery life.  Under typical use of a heavy reader, the original Kindle would last a good week with wifi off.  More battery life is always a welcome improvement to any gadget though.

Page Turning

The page turning buttons have been redesigned.  One of the biggest complaints about the original was how easy it was to unintentionally turn a page.  The Kindle 2 buttons are smaller so they are not as easy to hit accidentally.  Another welcome improvement is pages now turn 20% faster.  The first Kindle wasn’t exactly slow at page turning but you were often left wishing the page would render just a little faster and now the Kindle 2 does.

Storage

Amazon claims “more storage” in the Kindle 2.  This is a bit inaccurate since it really just has more built-in storage.  The original Kindle had an SD card slot for extra storage which means it could hold more if you used that slot.  The Kindle 2 does have more built-in storage but has removed the SD card slot so you are stuck with just the internal memory.  That isn’t a big problem since the internal storage can hold 1,500 books now.  And if you fill it up, you can delete books but still own them.  At any point, you can have a book re-downloaded to your Kindle.  The SD card slot was probably removed to help allow the device to be thinner.  While this is technically a lost feature, it is an acceptable tradeoff for the new thinness.

Screen

The new screen is very similar to the original except that it now has 16 shades of gray.  This allows pictures to look much better.  If you just read books, this is almost pointless.  But if you read newspapers on your Kindle, this will greatly improve your reading experience.

Book Cover

The original Kindle included a leather book cover.  Unfortunately, now this is a $29.99 accessory for the Kindle 2.  To protect your expensive Kindle 2, you have to buy the book cover which makes the Kindle 2 more expensive than its predecessor.

Conclusion

Most of the changes are positive.  Overall the new Kindle isn’t a huge jump over the original, it is more of several small design improvements.  This is a device any avid reader should definitely have.  For a full description of it, check out the Amazon Kindle 2 page.

MacBook as your Desktop

It used to be you needed both a laptop for travel and a desktop for more power. But nowadays laptops are a lot more powerful than they used to be and the cream of the crop are the MacBooks. With an external monitor, keyboard, mouse, and usb hub, you can easily switch from laptop mode to desktop mode with any MacBook by just plugging in 2 cables.

External Monitor

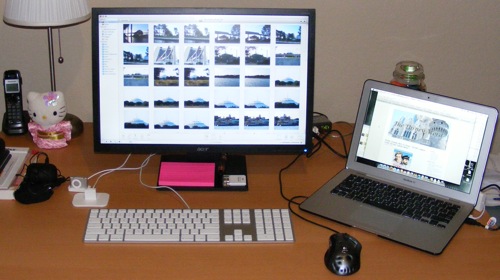
You can get an excellent big screen LCD for a lot cheaper than you used to.  You can hook it up to your MacBook, MacBook Pro, or MacBook Air with a DVI adapter and the exact adapter varies based on your model.  The original MacBook Air was nice enough to come with this adapter.  The new Airs and MacBooks do not so they’ll cost you an extra $30.  One of the best value monitors you can get is the Acer V223-WBD 22″ LCD (pictured above with MacBook Air).  Macs are smart when it comes to detecting external monitors so you can just plug in and the new monitor should almost immediately become an extended screen once powered on.  When you unplug, the Mac is similarly smart and goes back to single screen mode.

Keyboard and Mouse

Since we’re talking about Macs, the best keyboard to go with is the slim Apple Keyboard.  Pretty much any usb mouse will do but I highly recommend the Logitech MX518 Mouse. It is technically a gaming mouse but I just love it for the precision and extra buttons on the side that can be setup to quickly access expose.

USB Hub

A terrific USB hub is the D-Link 7-port USB hub.  7 ports may sound like a lot but with a keyboard, mouse, ipod/iphone cable, and external hard drive, you’re already mostly full.  With the hub, all your USB devices are plugged into this and then you just have to plug in one USB cable to your MacBook.

External Hard Drive

One area where laptops are still greatly lacking is hard drive space.  If you don’t have much in iTunes or iPhoto, you might be fine with just a 80-250GB laptop hard drive.  If you need more space, you’ll need to get an external drive such as the Western Digital 750GB My Book.  To move your iPhoto Library to your external drive, copy the “iPhoto Library” file from your Pictures directory to your external drive.  The next time you start iPhoto, hold down the option key and you’ll be given a choice to select where your iPhoto Library is.  Once you select the library on the external drive, you won’t have to hold down option again.  The only downside is you will need your external drive hooked up to see the library.  Similarly, you can copy your Music directory to the external drive and then open iTunes preferences and go to the Advanced tab.  There you can change the iTunes Music folder location to point to your external drive Music directory.  You should only do these things if you need to.  Often you might just have to move just iPhoto or just iTunes based on your usage.

Time Machine

If you plan to use Time Machine, which we recommend, you should consider partitioning your external drive into 2 partitions using Disk Utility which can be found in the Utilities directory under Applications.  Select your drive on the left of Disk Utility and then select the Partition tab.  You can slide the separator up and down to adjust the partition sizes.  We recommend giving yourself room to grow for your data such as iPhoto and iTunes and then leave whatever else for Time Machine to utilize.  When you are happy with your settings, click Apply.  You can then setup Time Machine to use 1 partition and put your iPhoto and iTunes data on the other.  The reason you need to setup 2 partitions is because Time Machine will continue to grow until it’s partition is full so you need to ensure your data has a separate area to grow.

Summary

With a little planning, you can have all the benefits of a laptop and a desktop with just one laptop.  Just plug in a USB cable to activate all your USB devices.  Plug in your external monitor to use your desktop sized LCD.  These principles can also be applied to a Linux or Windows laptop although not with such ease.  The performance of the MacBook line is what makes them ideal candidates for desktop-power uses such as photo editing.  If you have a MacBook, you likely don’t need a desktop and just buying an external LCD is a very cheap desktop solution.