Affiliate Links
The Tech DC website is partially supported by our affiliate sales. Support us by purchasing through these links.
The Tech DC website is partially supported by our affiliate sales. Support us by purchasing through these links.
What
SSL stands for secure socket layer. It is the technique used to encrypt and secure data over the internet. It is most known for use in web browsers. When you go to a secure web site (known as http over SSL or https), you will see a little lock icon somewhere which shows you that the site is secure. Things get complicated when you shop for SSL certificates where you can also get site seals or EV SSL and you’ll find a wide range of prices ranging from $30/year to over $1,000/year.
Terminology

Why
Without encryption, everything you send from your computer to a web server is totally readable by anything in between. Things get even more unsafe if you are at an open wifi spot at a cafe where anyone around you can watch all the unencrypted data you are sending and receiving. As a result, some actions such as site logins or purchasing online must be encrypted with SSL.
Where
There are several places you can buy SSL certificates. Many are extremely overpriced for no good reason. From cheapest to most expensive, I’d recommend the following:

There are several Tivo hard drive upgrade guides out there. I recently had to upgrade a Tivo HD drive for a Virginia customer and realized that most guides out there either don’t work or are unnecessarily complicated. As a result, I’ve collected the simplest way to do it which requires just one command if you’ve got everything you need.
What you need
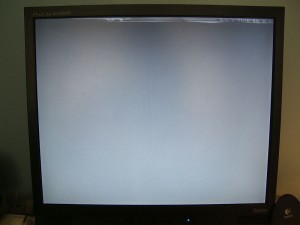
Most people have heard of screen burn-in. It is an imprint of an image on a display that is caused by that image being displayed too long. CRT burn-in was very common for things like taskbars that were always displayed on the screen in the same place. To prevent this, screen savers were invented to display different images to counteract the burn-in effects. Most people thought this problem went away when LCDs were created but that isn’t entirely true. It is uncommon in LCDs but it can happen. The crystals change their natural state enough to cause an imprinting of the persistent image, kind of like a shadow of it.
See the LCD screen to the right which has a menu at the top that still displays on a blank screen.
Prevention
Much like CRT burn-in, screen savers can help prevent the problem. It is a good idea to pick a screen server with lots of changing colors. Having your screen auto turn off when not in use will also help by not displaying the image more than it has to be.
Fixing
Unfortunately, preventative techniques will only do so much if you are always at your computer and not giving it an opportunity to turn off or run a screen saver. In that case, you need to know how to fix the problem. It is important to try to fix it as soon as you notice it as it is possible to become permanent if it continues too long. To fix it, you can try one of these following techniques:
If none of those work, your image is probably permanent and you are at your computer far too often.
The Aspire One currently ships with BIOS 3301 even though there is a later version. Unfortunately, they do not provide very good instructions on how to upgrade or exactly what the new BIOS fixes. The rumor is improved fan control. To install the update, perform the following steps.
Create a FreeDOS bootable USB flash drive
Once you have your USB flash drive, be sure it is formatted FAT32. Then download the program UNetbootin. Start up UNetbootin and select the Distribution FreeDOS. Then towards the bottom select your USB drive letter and click OK. The drive should now be bootable.
Acquire BIOS 3304
You can download the 3304 BIOS here. Extract the contents of the zip file and copy them to the USB flash drive.
Boot off the USB drive and install
Start up the Aspire One and hit F12 until the boot screen appears. Choose to boot off of your USB drive and you will see a UNetbootin screen where you can select default. You will then see 5 boot options. Select #5 FreeDOS Live CD only. Once booted, you’ll be at a DOS prompt on drive A:\. Change to C:\ by simply typing “C:\”. You should then be able to see the contents of your usb drive by typing “dir”. Then type “cd ZG5_3304” if that is the directory where you put your BIOS files. Then the last step is to type “3304.BAT” to run the install script. A progress screen will appear. The install should take less than a minute.
 Verify
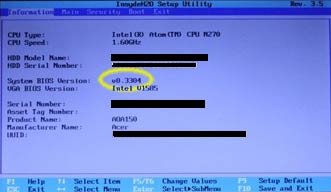
Once the flashing of the new BIOS is complete you can reboot. You can remove your USB flash drive. Press F2 at boot to get into the BIOS and confirm that System BIOS Version says v0.3304.
Problems
If you encounter any problems, the most likely cause is your usb drive. You can try to reformat your drive or use a different usb flash drive.