Netbooks versus Notebooks
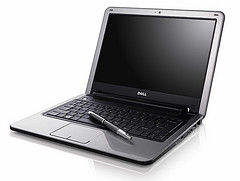
Dell Mini 9 NetbookMany DC area clients have asked me whether they should buy a netbook or a full notebook.

Netbooks (small laptops) have become very popular. We have written several articles about them. They started with the Acer Eee PC, followed by the Aspire Aspire One, then proliferating to dozens of models from suppliers including Dell and HP.

Price

Netbooks are typically cheaper, having started out at the $299 price point. Old models can be found for less and new models are now over $500.

This is a decent price for a computer, but keep in mind that 1) the netbook does not have a CD/DVD drive and 2) there are often online deals from sites such as Newegg that will provide a full size laptop for the same price. Dell also has online deals and stackable coupons periodically which you can find out about at Slickdeals.

Size

If you are looking for the smallest laptop possible, then you want a netbook. Be sure to try one though, because typing on a smaller keyboard and using a smaller screen make using a netbook less practical for longer stretches of work. DC area residents can go to Microcenter in Fairfax, Virginia to type on and test lots of netbooks and notebooks.

Speed

Netbooks are typically much slower, using Atom CPUs. A new line of Atoms, combined with the NVIDIA Ion platform, will allow full HD video decoding, so these laptops are getting faster. Still, one of the reasons that these laptops are cheaper is that they are slower. This is fine if you are typically just browsing the web and writing email. But if you need to use a few programs at once or work in more complex programs, the netbooks will feel a little slower.

Operating Systems

Netbooks typically come with Windows XP or a version of Linux, which is free and cuts down the cost. Linux is a great operating system that I use regularly. However, if you have regular software such as Word and Excel that you want to use, you will find it difficult to load that software on a Linux computer. There are good open source alternatives such as Open Office if you are okay using something that is similar to Office.

Recommendation

Laptops are a very personal purchase, depending on your preference on keyboard, mouse, and screen size. While I use netbooks for low-weight traveling, I would not use them to replace a laptop for extended use.
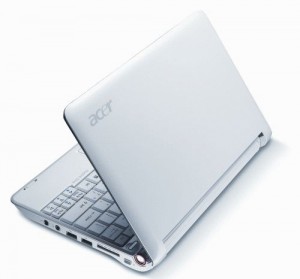
Acer Aspire One #1 Netbook

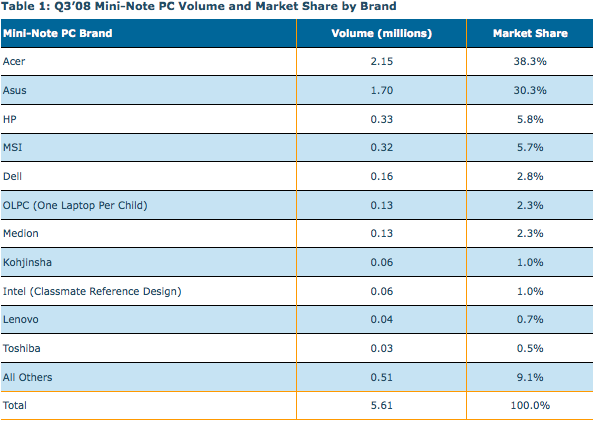
Our current favorite small netbook, the Acer Aspire One, is now the #1 selling netbook according to 3Q sales numbers as reported by DisplaySearch.
We expect competition to become only more fierce with companies continuing to flood the market with new models. Over the past week we just saw major price reductions from Lenovo whose IdeaPad S10 is now going for $349. HP similarly cut prices.

At some point, there could also be a response to the netbook market from Apple, either in a smaller screen laptop, a lower cost MacBook Air, or a tablet (a large iPod Touch?). While Apple has historically stayed away from cheaper products, this is the fastest growing part of the computer market.

Despite Acer’s loads of new netbook models released over 2008 (such as the recent Eee PC 1002HA), Asus gained market share with its simpler lineup with the Aspire One. See the full results below.

Acer Aspire One running Windows Vista

The Acer Aspire One is a fun little netbook, but it’s just not fast enough to run Windows Vista. That’s why Windows XP was included instead of Vista. Right? Well, I put that to the test and found that by modifying Vista as I described earlier, Vista runs great on the Aspire One.

It actually ran more fluidly than Windows XP did. I attribute that mainly to Vista’s support of:

  1. the Atom chipset’s hyperthreading. XP Home does not take full advantage of the chipset.
  2. ReadyBoost, a Vista feature that uses a flash drive to cache and speed up random reads that would otherwise go to the hard drive.

See this video of my Aspire One showing the speed of opening several applications:

Acer Aspire One RAM or Hard Drive Upgrade

Aspire One Upgrade Options

The Acer Aspire One comes with 1GB of RAM and a 160GB SATA Hard Drive.  For an idea of its performance, please check out this video.  RAM can be upgraded to 1.5GB by replacing a 512MB stick with 1GB. We recommend the Kingston PC2 4200 1GB Laptop Memory.  The hard drive can be upgraded with another 2.5 inch SATA hard drive such as the Western Digital 320GB 5400 RPM Scorpio.

Performing these upgrades are not a simple matter as you have to completely take the netbook apart.  Do this at your own risk.  It is also a lengthy process so be sure you set aside a good hour of time.

Requirements

Once you’ve picked out your new RAM or hard drive, you’ll be ready to begin the upgrade.  In addition to a screwdriver, you will need a credit card.  You may also want some bowls to organize screws that get removed and enough space to place removed components.  It is also a good idea to use a towel to cover the screen during the process.  If you are upgrading the hard drive, you will be losing all the data on the included drive.  If you are installing from scratch, then you have nothing else to do.  If you want to duplicate the included OS on the original drive, you will need to run the dd linux command to copy it to your new drive.  To do this, you will need a 2.5 inch external USB SATA enclosure to put the new drive in to copy to.  If you are unfamiliar with this, it is a very similar process to duplicating the drive in a Tivo.


Step 1 – Remove bottom screws 

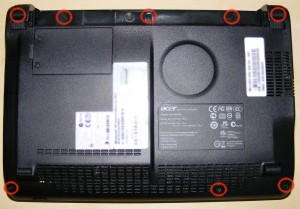
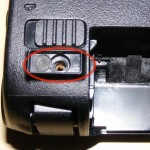
Flip over the Aspire One so that the bottom is accessible. There are 6 obvious screws to remove on the bottom of the Aspire One.  In addition to that, there are two hidden screws under the back rubber feet.

You will need to peel off the back rubber feet to get to those screws.  I used pliers to slowly peel up the rubber feet.  Try to not touch the sticky side so that they can be reapplied after.  When done, they reapply rather easily.  The 3 screws from the back and front are different sizes to be sure to organize them correctly.

Step 2 – Lift up keyboard 

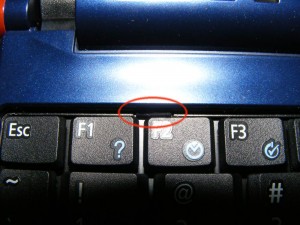
Flip the Aspire One over so the keyboard is facing up.  There are three clips holding the keyboard down by the F2, F8, and Pause keys.  You need to push these clips back and down with a credit card so they are no longer visible.  After doing this, the clips may pop back up and need to be redone.  Once they are all back, you can slide the credit card under the keyboard to pry it up.  Do not put the credit card under the keys but under the keyboard.  You can then slide the credit card around the sides prying the entire keyboard up.

Step 3 – Unplug keyboard and remove more screws 

Lean the keyboard forward to expose where it is plugged in towards the center.  This cable is held down with a clamp that is on top of it.  You can flip this up to release the connector.  The keyboard should now be loose and can be put aside.  Right below the keyboard connection is a smaller similar connector for the trackpad.  In the same manner, flip up the clamp which will release the trackpad cable.

Step 4 – Remove top panel surrounding keyboard 

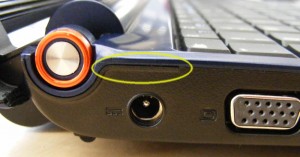
Towards the back left above the AC plug is the best place to start prying open this panel.  Push the credit card between the panel and the base to begin prying it open.  Then slide the card completely around the panel which will free it so it can be removed.

Step 5 – Unplug, unscrew, and remove motherboard 

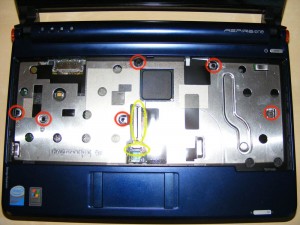
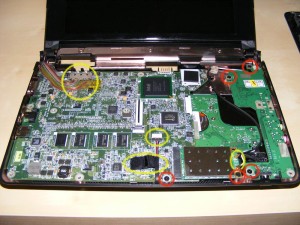
The video cable is towards the upper left. It is held down with tape so first pull up the tape and then pull out the connector.  Towards the bottom middle is another cable held down with black tape.  Lift up the black tape and then slide out the connector leaving the cable dangling.  Towards the bottom right is the Wi-Fi card.  To the right of the card are 2 cables plugged into it.  Unplug these by pulling them directly up then leave them dangling.  The Wi-Fi card is held in with one screw.  Unscrew it and the card will be easy to remove so you can set it aside.  There is a main board to the left and a daughter board to the right.  The main board has just one screw towards the bottom and the daughter board has three screws.  All of these screws need to be removed.

Step 6 – Replace RAM and/or Hard Drive 

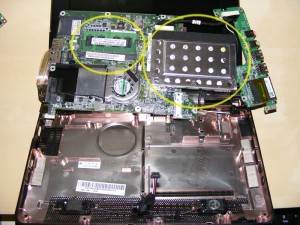
You can now flip up the boards to expose the underside where the RAM and hard drive are.  The RAM is on the left and is held down in the typical way with prongs on the sides.  Remove the 512MB card and insert your 1GB card.  It is in properly if the prongs fit into the notches on the card.  The hard drive is to the right and can be separately unscrewed to replace.

Step 7 – Put it all back together 

By this point, hopefully you’ve kept all the components and screws well organized because you just have to do everything in reverse.  When putting the boards down, be sure you have everything flush and tightened so there is enough room for the keyboard to go back in on top of it.  Don’t forget to plug all connectors back in so review the above steps to be sure you do.  The panel around the keyboard will snap in as will the keyboard itself by applying a little pressure.  Before screwing in the bottom screws, you might want to boot up to make sure everything is working.

New Aspire One Netbook with 160GB Hard Drive Demo Video

New King of Netbooks

Acer has just started selling a new Aspire One netbook. The latest improvements in this model are an increased SATA hard drive to 160GB and a 6-cell battery which will yield a good 5 hours of use even playing movies. It includes a low power Intel Atom processor running at 1.6GHz. Many people assume all netbooks are slow but the following video demonstrates that it is more than powerful for most computer uses today. This is in part due to the SATA hard drive which outperforms the more commonly found SSD option.

See the video demo that I made here: