 There have been many technologies I’ve been skeptical of, none more so than Ooma, a VoIP phone service
 . If you don’t know what that means, essentially it is a way to make phone calls through your pre-existing internet connection as opposed to using a normal phone line. Ooma has several big selling points, all of them true.
- You don’t need a running computer to use it.
- You can hook up all your old normal phones to it.
- Landline call quality.
- Free US long distance. International calling available for pennies per minute.
- Typical services like Caller-ID, call-waiting and voicemail are included.
- And last but not least, the service is free. There is also $100/year premier service that adds even more features like an extra phone line, extra phone number and the ability to check your voicemail online.
So what’s the catch? Well, there are a few.
Purchase Hardware
You do have to purchase the Ooma Core VoIP Phone System . That link goes to amazon which is the cheapest place to buy it from. List price is $249.99 but amazon usually has it for much cheaper.
Installation
Because Ooma is an internet service, it isn’t for everyone. You need to have at least some basic understanding of computer technology. If you don’t know what an ethernet cable or router are, this product isn’t for you.
The first step is to actually activate your Ooma service which you can do through ooma.com. It is a very short and simple process where you enter a few numbers on the bottom of the Ooma Hub and then select your primary phone number and password. After that, you’re ready to install the devices. You also have the option to port over your current home phone number but that costs $40 and takes more time.
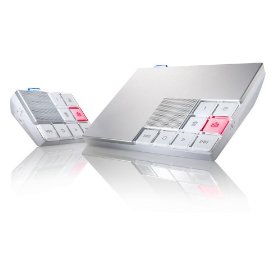
When you purchase the Ooma Core VoIP System, you receive an Ooma Hub and an Ooma Scout. The hub is what connects into your network like a computer and is what does all the work. The scout is hooked up anywhere you want additional phone lines. 1 scout is included but you can purchase extra scouts as you need them. If you have a cordless base station phone with extra handsets, that is ideal because only the base station needs to be near the hub or scout. I highly recommend the Panasonic Dect 6.0 – 3 Handset System
 .
.
 Ooma recommends you install the Ooma Hub between your router and DSL/Cable Modem but I do not because it adds unnecessary complication to your network. Instead, treat the hub like you would any computer and plug its “modem” port directly into your network router/switch. As a result, ignore the “home” port. You can plug a phone into the “phone” port and the “wall” port should plug into your home phone line system. That is how the Ooma Scout communicates with the Ooma Hub, over your pre-existing phone wiring. At at any phone jack, plug in the Ooma Scout which just has a “wall” and “phone” connection to hook up another phone.
Packet Prioritization
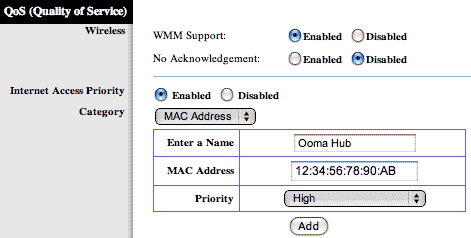
One reason Ooma wants to hook up right after your DSL/Cable Modem is because it can then prioritize the Ooma packets to be high priority. Without that, heavy internet usage could cause your voice quality to degrade. Instead, you can setup Quality of Service (QoS) in most modern routers. In Linksys routers for example, look under “Applications & Gaming” and then “QoS”. You will want to add “High” priority to the MAC address of your Ooma Hub. The MAC address is located on the bottom of the hub. As long as you’ve done QoS for the Ooma Hub or installed the hub in front of your router, your packet prioritization should work perfectly.
Call Quality
I was most skeptical about the claimed landline call quality. I’ve used many other VoIP services, the most popular of which is Skype. Skype call quality does not compare to a landline in my opinion. It is acceptable but not awesome. Vonage is considered to be high quality but is very expensive for VoIP. Ooma is free after you purchase the initial hardware. The resultant call quality really did shock me. It sounds terrific but you don’t have to believe me. Check out all of these Amazon Reviews .
.
While I had great call quality, it doesn’t mean you will. Because Ooma goes through your internet connection, the call quality is completely dependent on the quality of your internet. Typically the upload speed is what is the biggest bottleneck. Ooma recommends you have at least 256Kbps. I have a 768Kbps plan and get about 670Kbps on average. It appears Ooma tends to use about 100Kbps so it makes sense they recommend more so you have room to make calls while still using your internet for other things.
I attempted to see if I could push my internet connection to its limits and see how Ooma would react. I did 2 Ooma voice calls (via the premier plan’s 2nd line), 1 iChat video, while also downloading an HD movie and uploading large files to servers. Ooma call quality did not degrade at all. In part, this is because the Ooma data packets were higher priority than all the others. So you can push your internet usage as much as you can and the Ooma calls should not degrade.
Faxing over VoIP is notoriously difficult due the way the compression virtually destroys the fax data stream. Impressively, faxing over Ooma does seem to work. They don’t guarantee it will work but it did work in my tests. You have to dial *99 from your fax machine before the number. It is unclear exactly what this *99 does but I assume it tells Ooma to prepare for a fax and it can then optimize for that. They imply that the shorter the number of pages are you sending, the better your chances of success.
Blacklists
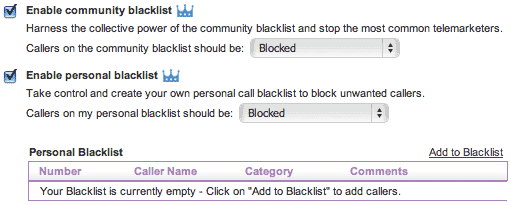
One really neat feature I feel I have to mention is the blacklists. This is only a premier feature but it is really cool. Lets say you get a call from a telemarketer. Feel free to hang up on them or taunt them as you wish but afterwards, login to ooma.com and blacklist that number. You don’t even have to enter it, you just select it from your call history. Then that number can never call you again. Instead, they will hear a very pleasant voice telling them they are blocked. In addition to the personal blacklist you can maintain, there is also a community blacklist. If enough other Ooma users mark a number as blacklisted, then it will eventually be blocked for everyone using the community blacklist even if they’ve never called you. This is actually how spam blockers work so I consider it a phone spam blocker. The last remaining unwanted call I get is from telemarketers who block their number. You can setup Ooma to not ring if no caller-ID information is available. In all of these blocking solutions, you have the choice to simply block them or send them directly to voicemail.
The Real Cost
If you used a VoIP service that required your computer to be on 24/7, you’ve got to pay for the high power usage of your computer. The Ooma Hub uses about 10 watts so it will add very little to your electric bill. If you want the premier service that offers some very attractive extra features, it is $12.99/month or $99.99/year. The initial hardware purchase is over $200 but hopefully the hardware will lasts for years. It is essentially like a router and routers usually last for years. If your hub broke, you’d have to contact Ooma to get it replaced and that cost is unclear. For me, having the hub and the scout was all I need but some people might need additional Ooma Scouts and those are not that cheap at $69.99 each. There is no charge for the normal Ooma service plan. They do technically have a 3,000 minutes/month limit but claim they have never actually shut anyone off due to that. They say they only have an official limit to prevent commercial use.
The Company
So the calls are great, the service is free, but will this company survive? That’s perhaps the biggest concern. Ooma, Inc. is a privately held company so not much is known about their profitability. The risk is that you buy a $200+ hub that becomes worthless when the company goes under. On the other hand, the company has shown signs that they may have an ok future. Currently they only make money off of the hardware sales and premier plan. They have also said they are looking into business solutions such as an Ooma service with 8 phone lines. This could be very lucrative for Ooma and allow them to continue to offer their free service indefinitely.
Conclusion
If you are willing to take on the risk of dealing with a company you don’t know much about, the payoff could be big in phone bill savings. I didn’t believe all the amazon positive reviews but in the end, I have to agree with them. The service has worked great. I like some of the extra premier features like the blacklist and extra phone line and phone number. I have a local phone number but also a number near relatives across the country so that they can call me without paying long distance. You can’t do that with a real phone line, nor the blacklists.
Ooma is relatively easy to hookup and use. The extra features and nice website make me highly recommend it.
 There have been many technologies I’ve been skeptical of, none more so than
  Ooma recommends you install the Ooma Hub between your router and DSL/Cable Modem but I do not because it adds unnecessary complication to your network. Instead, treat the hub like you would any computer and plug its “modem” port directly into your network router/switch. As a result, ignore the “home” port. You can plug a phone into the “phone” port and the “wall” port should plug into your home phone line system. That is how the Ooma Scout communicates with the Ooma Hub, over your pre-existing phone wiring. At at any phone jack, plug in the Ooma Scout which just has a “wall” and “phone” connection to hook up another phone.

