Acer Aspire One RAM or Hard Drive Upgrade

Aspire One Upgrade Options

The Acer Aspire One comes with 1GB of RAM and a 160GB SATA Hard Drive.  For an idea of its performance, please check out this video.  RAM can be upgraded to 1.5GB by replacing a 512MB stick with 1GB. We recommend the Kingston PC2 4200 1GB Laptop Memory.  The hard drive can be upgraded with another 2.5 inch SATA hard drive such as the Western Digital 320GB 5400 RPM Scorpio.

Performing these upgrades are not a simple matter as you have to completely take the netbook apart.  Do this at your own risk.  It is also a lengthy process so be sure you set aside a good hour of time.

Requirements

Once you’ve picked out your new RAM or hard drive, you’ll be ready to begin the upgrade.  In addition to a screwdriver, you will need a credit card.  You may also want some bowls to organize screws that get removed and enough space to place removed components.  It is also a good idea to use a towel to cover the screen during the process.  If you are upgrading the hard drive, you will be losing all the data on the included drive.  If you are installing from scratch, then you have nothing else to do.  If you want to duplicate the included OS on the original drive, you will need to run the dd linux command to copy it to your new drive.  To do this, you will need a 2.5 inch external USB SATA enclosure to put the new drive in to copy to.  If you are unfamiliar with this, it is a very similar process to duplicating the drive in a Tivo.


Step 1 – Remove bottom screws 

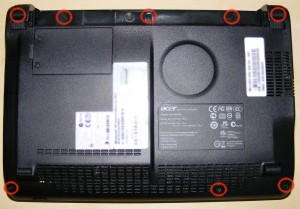
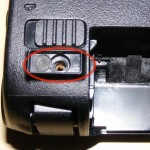
Flip over the Aspire One so that the bottom is accessible. There are 6 obvious screws to remove on the bottom of the Aspire One.  In addition to that, there are two hidden screws under the back rubber feet.

You will need to peel off the back rubber feet to get to those screws.  I used pliers to slowly peel up the rubber feet.  Try to not touch the sticky side so that they can be reapplied after.  When done, they reapply rather easily.  The 3 screws from the back and front are different sizes to be sure to organize them correctly.

Step 2 – Lift up keyboard 

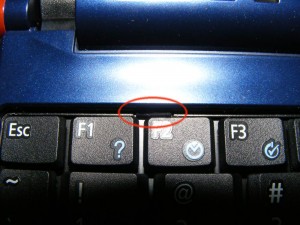
Flip the Aspire One over so the keyboard is facing up.  There are three clips holding the keyboard down by the F2, F8, and Pause keys.  You need to push these clips back and down with a credit card so they are no longer visible.  After doing this, the clips may pop back up and need to be redone.  Once they are all back, you can slide the credit card under the keyboard to pry it up.  Do not put the credit card under the keys but under the keyboard.  You can then slide the credit card around the sides prying the entire keyboard up.

Step 3 – Unplug keyboard and remove more screws 

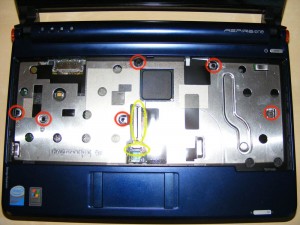
Lean the keyboard forward to expose where it is plugged in towards the center.  This cable is held down with a clamp that is on top of it.  You can flip this up to release the connector.  The keyboard should now be loose and can be put aside.  Right below the keyboard connection is a smaller similar connector for the trackpad.  In the same manner, flip up the clamp which will release the trackpad cable.

Step 4 – Remove top panel surrounding keyboard 

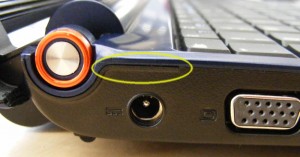
Towards the back left above the AC plug is the best place to start prying open this panel.  Push the credit card between the panel and the base to begin prying it open.  Then slide the card completely around the panel which will free it so it can be removed.

Step 5 – Unplug, unscrew, and remove motherboard 

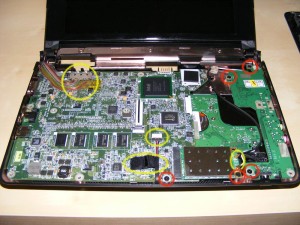
The video cable is towards the upper left. It is held down with tape so first pull up the tape and then pull out the connector.  Towards the bottom middle is another cable held down with black tape.  Lift up the black tape and then slide out the connector leaving the cable dangling.  Towards the bottom right is the Wi-Fi card.  To the right of the card are 2 cables plugged into it.  Unplug these by pulling them directly up then leave them dangling.  The Wi-Fi card is held in with one screw.  Unscrew it and the card will be easy to remove so you can set it aside.  There is a main board to the left and a daughter board to the right.  The main board has just one screw towards the bottom and the daughter board has three screws.  All of these screws need to be removed.

Step 6 – Replace RAM and/or Hard Drive 

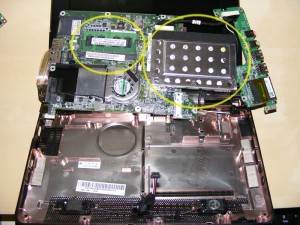
You can now flip up the boards to expose the underside where the RAM and hard drive are.  The RAM is on the left and is held down in the typical way with prongs on the sides.  Remove the 512MB card and insert your 1GB card.  It is in properly if the prongs fit into the notches on the card.  The hard drive is to the right and can be separately unscrewed to replace.

Step 7 – Put it all back together 

By this point, hopefully you’ve kept all the components and screws well organized because you just have to do everything in reverse.  When putting the boards down, be sure you have everything flush and tightened so there is enough room for the keyboard to go back in on top of it.  Don’t forget to plug all connectors back in so review the above steps to be sure you do.  The panel around the keyboard will snap in as will the keyboard itself by applying a little pressure.  Before screwing in the bottom screws, you might want to boot up to make sure everything is working.

New Aspire One Netbook with 160GB Hard Drive Demo Video

New King of Netbooks

Acer has just started selling a new Aspire One netbook. The latest improvements in this model are an increased SATA hard drive to 160GB and a 6-cell battery which will yield a good 5 hours of use even playing movies. It includes a low power Intel Atom processor running at 1.6GHz. Many people assume all netbooks are slow but the following video demonstrates that it is more than powerful for most computer uses today. This is in part due to the SATA hard drive which outperforms the more commonly found SSD option.

See the video demo that I made here:


Get a Battery Boost with APC Mobile Power Pack

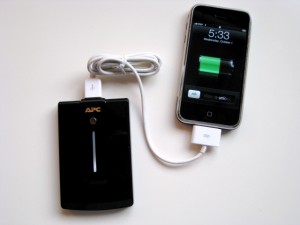
The APC UPB10 (about $60) is a handy little battery that is charged from and charges over USB. It is the size of a deck of cards and is very useful if you need to finish that game, movie, or phone call when you are away from a power outlet.

The APC UPB10 more than doubles the power to an iPhone, Blackberry, or Sony PSP. It charges any USB device, which also includes some GPS devices and cameras.

It does require you to push a button to activate the power. If the device you are charging is nearly out of power, the APC will continue to charge it. If the device is nearly full, the APC will only charge it for about 20 minutes before you need to press the button again. It does this to save the battery.

If you are like me and sometimes find yourself on the other side of D.C. without any cell phone power left, the APC UPB10 can help.

Best Instant Messengers

There are many instant messaging options for communicating with your friends and colleagues. In order for instant messengers to work together, they need to use the same protocol. To avoid interoperability issues, consider one of the messengers listed here that supports multiple systems.

Windows and Linux

Pidgin works with all the major IM systems: AIM, ICQ, Jabber/XMPP, MSN Messenger, Yahoo!, Bonjour, Gadu-Gadu, IRC, Novell GroupWise Messenger, QQ, Lotus Sametime, SILC, SIMPLE, MySpaceIM, and Zephyr.

It is also highly customizable with lots of plugins. Lifehacker.com lists their ten favorite plug-ins.

Mac OS X

By default, the Mac comes with iChat which is the best videoconferencing solution for Mac. Unfortunately, iChat only works with Macs.  It uses a Jabber transport and connects with AOL Instant Messenger (AIM), .Mac, ICQ and XMPP.

For instant messaging and more interoperability on the Mac, Adium is similar to Pidgin and works with all the major IM protocols.

IM + Video + Calling Land Lines

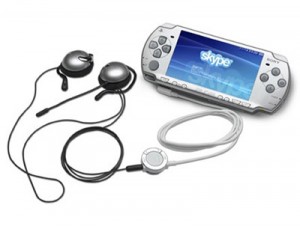
If you also want videoconferencing, Skype is the most popular solution. It works on Windows, Mac, Linux, and even some mobile devices like Windows Mobile PDAs and the Sony PSP (pictured). It also has the paid options of Skype Out (calling a phone) or Skype In (getting a phone number that rings your Skype account). On the downside, Skype is a proprietary protocol that only works with Skype.

iPhone App Follows the Presidential Election Polls

Living in the Washington D.C. area, I meet a lot of political junkies. A great application for them is Election ’08 for iPhone & iPod Touch by Aaron Brethorst. It costs $0.99. While the information it provides is freely available from electoral-vote.com, Election ’08 displays the information well and is easy to browse. It gives you the polls and trends by state, as well as historical data for past elections.

I’ll be watching my state of Virginia because it is a close swing state. Election ’08 shows that Washington D.C. is the most skewed state with 90 to 9 currently for Obama.

If you are interested in the election poll results as they come in and you have an Apple iPhone or iPod Touch, Election ’08 is worth the $0.99.