Poor Search Results
So you’ve made your shiny new website but you’re not getting any visitors. That’s probably because you haven’t worked on your search engine optimization (SEO). The primary way for most sites to get visitors is through coming up in the web search results when people are looking for whatever you offer. If you don’t come up well in the search results, you won’t get many visitors.
Track Your Visits
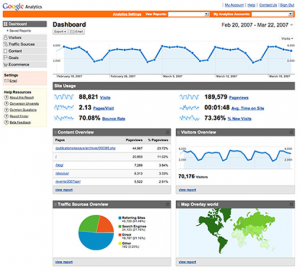 The first thing to do is setup tracking systems so you know exactly how many visitors you have so you can tell if you are doing better or worse when you work on your SEO. The best choice for this is to use the free Google Analytics. It involves creating an Analytics account and then placing some simple javascript code on every one of your pages that you want to track. You can then log in on the analytics site to see your visitor information at any time from anywhere.
Google vs The Rest
There are several search engines out there. The big ones are Google, Yahoo, and Live (Microsoft’s search also used on MSN). The short and ugly truth is that Google rules search and all the others combined don’t equal Google. This has the advantage of leaving your focus just on the Google results though. If you do well on Google, you almost always do well on the other search engines as well anyway.
PageRank
The most important thing when it comes to your Google search results placement is the PageRank of your page. In Google’s eyes, a page is not a site. A site is made up of one or more pages and Google only ranks based on the pages, not the site. So for example, mysite.com is one page and mysite.com/help is a different page. Your main page might have a high PageRank and your other pages may be low. Your goal should be to get your main page or wherever you want people to land (arrive to your site) to have a good PageRank. If you install the Google Toolbar in your Firefox or Internet Explorer browser, you can see the PageRank of each site you visit. These numbers are not quickly updated by Google so it might take a month or more to see a change there that actually already took place.
PageRank Improvements
So how does one go about getting a higher PageRank? This is actually the simplest part to understand. The more links to your page, the greater your PageRank. The hard part is figuring out how to legitimately get more links to your page. The way to do this varies greatly depending on your field. If you make software for example, be sure to list your software on all the software download sites, many of which will let you link directly to your site. You can submit to open internet directories such as dmoz.org. You can try to list your site on reputable forums in your area of interest. If you have a good product and people start to notice, you may gain links from others as well such as being mentioned on a blog or newspaper site. The greater the PageRank of the page that links to you, the more helpful it is to your page.
Relevant Keywords
If you want to show up well for certain phrases in search results, be sure you use those phrases on your site several times. If you don’t have the phrase, don’t expect to be found when searching for it, no matter what your PageRank. Hence, it is most important to decide what people might be trying to search for to find your product or service. If you think people are going to search for “big hats”, then don’t use “Hats that are big” on your site. Use the actual phrase that you think they will search on. In general, the more you use a phrase, the better you do but there is a limit. If you overuse, Google will catch on and actually penalize it. A good rule of thumb is to make your site still read well to a human. If it starts to sound weird, you are going too far. The more unrelated text you have on your page, the more it will dilute the important words.
Keywords in the Page URL
If you want to sell big hats and you make your page mysite.com/big-hats/, those keywords will do better in the search results with that page URL. You can use dashes or not although dashes can help differentiate exact words. Similarly, if you can buy a domain with the keywords that are most important to you, that can help even more. You may want to use mylastname.com but mybighats.com would win the search results battle.
Link Keywords
Whenever you are able to get links, it is preferable to use your desired keywords in the link text, also known as anchor text. This is the text that is displayed in the clickable link. If you do this, those keywords will get a bonus in the search results. Unfortunately, with many of your links, you may not have such control but whenever you do, try to utilize that benefit.
Title, Meta Description, and Meta Keywords
There are 3 more useful areas to be sure to use your most desired keywords. The Title of the page is very prevalent to the human eye and also can get you a bonus in the search results for the words you use. If you have multiple pages on your site, be sure to use appropriate titles on each page. Remember that Google ranks pages, not sites. The same goes for the meta description and meta keywords. These are hidden items in the html of your page that only search engine robots will see. Within the <body> tag of your html, you can add the following:
<meta name=”description” content=”Big Hats at great prices in the Washington D.C. Area”>
<meta name=”keywords” content=”big hats, washington d.c., dc”>
The meta description will also be shown in Google search results under your site so it is extra important to make that text short and descriptive to bring in visitors. The meta keywords help guide Google by telling it what you think your page should do well on. However, Google will make up its own mind on this so if you list keywords that aren’t found on your site, it won’t help. Be sure these meta keyword suggestions are also in your page content.
Study the Enemy
A great way to climb the ranks for a certain search phrase is to look at the top results for the phrase you are examining. Try to figure out why they are the top. What is their PageRank? How often do they use the search keywords on their page? What is in their title or description? Who is linking to them and can you get similar links? With the Google toolbar you can install in your browser, you can look at the backward links (links going to the site you are examining).
What Not to Do
It is just as important what you don’t do as what you do. If you get links on blacklisted link farms or on bad forums, you may be hurting your PageRank and search results. If you are trying to get a link from a certain page, be sure to check out its PageRank first. If you list referral (paid) links to other sites, you may be penalized for that as well. You should also not try any tricks in your html such as links that are invisible to the human eye. Google looks for such things and will penalize or totally blacklist you for it. If you have too many links on your page going to other sites (100 or more), you will get penalized for that as well since you’ll appear to be a link farm yourself.
Patience
Last but not least, you must be patient. Most of the changes you can make to your site won’t quickly have any influence in search results placement. Changes can take weeks to influence the results so don’t rush into conclusions before you give an idea time to work. The amount of time it takes can actually vary from a few days to about a month.
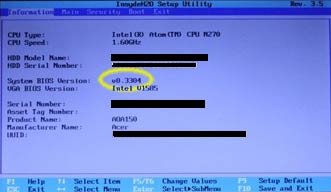
currently ships with BIOS 3301 even though there is a later version. Unfortunately, they do not provide very good instructions on how to upgrade or exactly what the new BIOS fixes. The rumor is improved fan control. To install the update, perform the following steps.
 Verify
