How to test Ethernet cables and WiFi speeds

I recently had to diagnose poor ethernet speeds in a home in Arlington, VA. A person was getting 60 Mbps/sec, certainly not bad, but far less than the paid for 100 Mbps/sec. The problem was first diagnosed by going to speed test websites:

http://www.speedtest.net

https://www.speakeasy.net/speedtest/

This computer had FIOS, so I plugged a testing computer I had directly into the ONT (optical network terminal, where the fiber enters the house). From there I did get 100 Mbps/sec, so I knew the culprit was within the home network. I next tested the speeds from the home router. Those speeds, over both wifi and ethernet showed the slow speeds. So the main culprit appeared to be the cable connecting the ONT to the router.

To test the cable, I used iPerf, one of my favorite speed test tools. To buy a dedicated device that tests speeds can cost in the thousands of dollars from a company like Fluke. This is because you’re essentially buying a computer to do the tests. iPerf is a free tool that just uses your computers for the testing. You need to install iPerf on two computers and run one in client and one in server mode.

I used iPerf to test that suspect cable and got the following results:
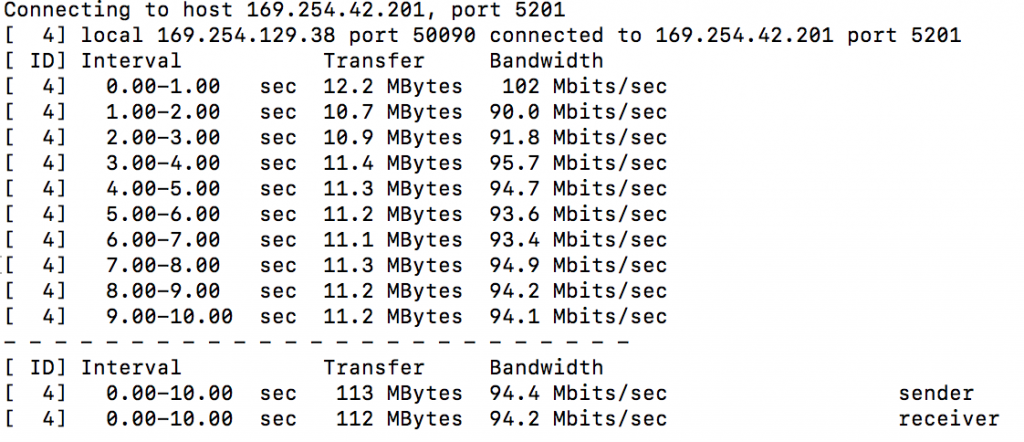
iPerf output showing 100 Mbits/sec speed capability of cableA good cable should get 10x this speed. So I re-terminated one of the cable ends to see if that would fix the cable. I couldn’t easily replace the cable since it took a difficult path through a wall. Happily fixing one end of the cable gave me the following iPerf results:

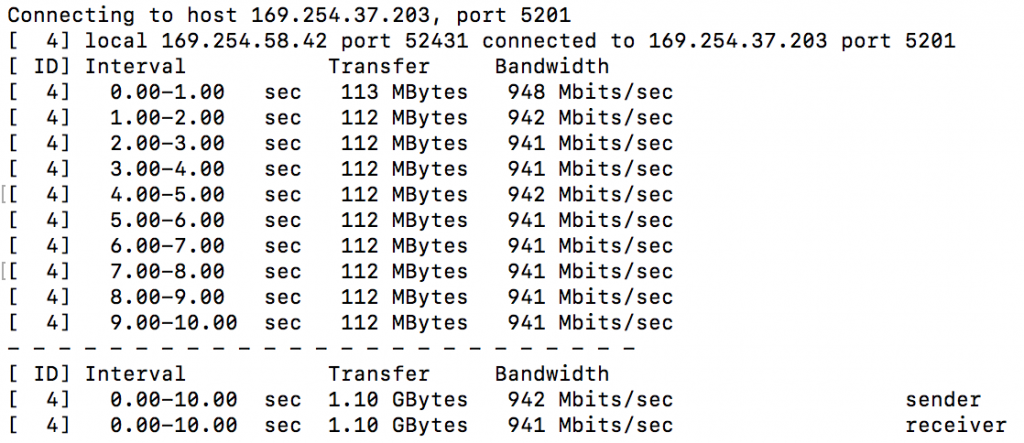
iPerf results showing gigabit speeds

This is what an operational cable’s results look like, showing gigabit speeds.

I next tested other ethernet jacks and the WiFi using iPerf and everything else checked out.

Unfortunately, this kind of testing isn’t widely performed. Most people don’t noticed degraded speeds in the first place. And if they do notice, they don’t know where to start to figure out the problem. Comcast and Verizon don’t normally perform this level of testing in my experience. Once the internet providers see good speeds getting to the house, they let the users deal with local network issues.

Test RAM on a Mac

If you have new RAM in your Mac or if you are trying to diagnose weird shutdowns and problems, you should consider testing your RAM. An easy way to do so is to follow these instructions from the command-tab article “How to Test RAM Under Mac OS X“.

  1. Download the memtest_422.zip file and install the program.
  2. Shut down and then restart the computer holding down Command and S keys.
  3. When at the prompt, type “memtest all 2” which will test all the memory twice.

This will take several hours to run but should diagnose the tricky problem of bad RAM.

iPhone Special Diagnostic Codes

Thanks to AppleGuy Tom for providing these codes which work on most US AT&T phones and have been tested on the iPhone. Simply type these codes as if you are calling them.

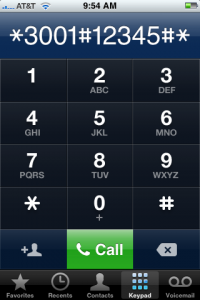
*3001#12345#* -Displays the Field Test Mode, network, cell, GPRS, call, and version information.

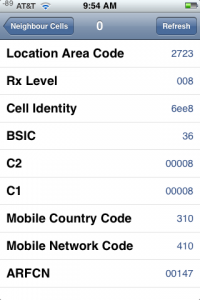
This picture shows the information from one of my cell towers. The Rx Level is showing the signal strength from that particular cell. Note that in Field Test Mode the signal meter in the top left corner changes from a 5 bar readout to a number. This is more accurate and can help when placing your antenna for a signal booster, for example.

*#06# -Displays the 15 digit IMEI (International Mobile Equipment Identity) in the middle of the screen. (This number is also printed on the back of the iPhone.)
This number is worth writing down. Your carrier can deactivate the phone with this number so that it will not work if ever lost or stolen, even when using another SIM card.

*#21# Displays ‘forwarding’ state (enabled or disabled) voice call, data, fax, SMS, sync data, Async data, packet access, and pad access forwarding for outgoing calls.

*#30# -Displays ‘Caller ID’ (enabled or disabled).

*#33# -Displays ‘barring’ state (enabled or disabled) voice call, data, fax, SMS, sync data, Async data, packet access, and pad access forwarding for outgoing calls.

*#43# -Displays ‘call waiting’ state (enabled or disabled) voice call, data, fax, SMS, sync data, Async data, packet access, and pad access forwarding for outgoing calls.

*#61# -Displays ‘call forwarding to voicemail’ state (enabled or disabled) [and number forwarded to] of voice call, data, fax, SMS, sync data, Async data, packet access, and pad access forwarding for outgoing calls.

To change the number of seconds before the call forwards to voicemail, retrieve your eleven digit number from *#61# then carefully type *61*numberRetrieved*11*30# -those last two digits are the seconds to ring (Default is 20; Max = 30)

*#62# -Displays ‘call forwarding when unreachable’ state (enabled or disabled) [and number forwarded to] of voice call, data, fax, SMS, sync data, Async data, packet access, and pad access forwarding for outgoing calls.

*#67# -Displays ‘call forwarding when busy’ state (enabled or disabled) [and number forwarded to] of voice call, data, fax, SMS, sync data, Async data, packet access, and pad access forwarding for outgoing calls.

*225# -Requests an SMS message displaying the current monthly balance. (if applicable)

*646# -Requests an SMS message displaying the remaining monthly minutes. (if applicable)

*777# -Requests an SMS message displaying the pre-paid account balance. (if applicable)

Some other AT&T codes currently do NOT work on the iPhone: *#4720# (voice quality reduction codec -to save battery) and  *3370# (better voice quality codec)