Adding iTunes Next Track Keyboard Shortcut for Logitech Easy-Switch Bluetooth Keyboard

The new Logitech Easy-Switch Keyboard for the Mac is an awesome keyboard.  It has a big advantage of 3 keys that quickly connect to 3 different Mac or iOS devices.  You can put your Mac on button 1, iPad on button 2 and iPhone on button 3.  Just one press and you’re ready to type on the device.  Unfortunately, to have these 3 buttons, the iTunes next track and previous track buttons aren’t there like on Apple keyboards.  I use those all the time and its just not the same having to take your hands off the keyboard and mouse over to iTunes to click next.  Fortunately, the Mac has the ability to define new keyboard shortcuts.

Step 1 – Create a new Service for iTunes Next Track via automator

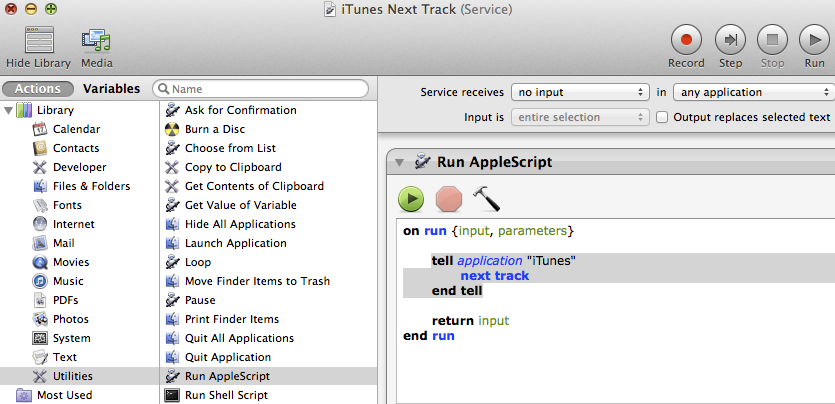
Launch the Automator app and create a new Service.  In that service, Run AppleScript and select no input for what the service receives.  The AppleScript tells iTunes to go to the next track.  Save the service as iTunes Next Track.  You can create a new service and do the same for iTunes Previous Track.  It is exactly the same process except change the AppleScript “next track” to “previous track”.

Step 2 – Define the Keyboard Shortcut

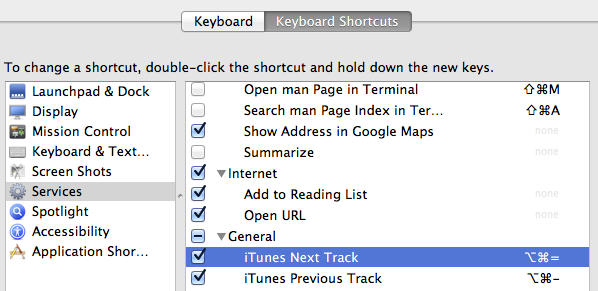
Your new Services should appear under Keyboard Shortcuts in System Preferences.  They are at the bottom of the Services list.  Here you can select the shortcut and then enter the keyboard shortcut you want to use.  In my case, I chose to use “option command =” because the = key also has a + on it so + to go next track and – to go previous track.  You must choose this shortcut wisely or it may not work.  If an app that has focus has the same shortcut, it will overrule this one so you need to choose something that doesn’t seem present in the apps you are using.  That’s part of why I had to use “option command” because just one of those with = is already in use in some programs I use.

Fortunately, the play/pause and volume buttons are still there so those don’t need to be re-created on the Logitech Easy-Switch Keyboard.  Even though I now have to hit 3 keys at once instead of just the next button, the Logitech Easy-Switch Keyboard is the best wireless keyboard for the Mac.



Dropbox Automator Service for Saving Selected Text

Always looking for new uses for Dropbox, I came across a couple of sites showing the same tip: 1) It’s All Tech’s How to automatically copy your Mac OS X clipboard to Dropbox and 2) Tip #1 in this MacOSXTutorials12 video.

What it Does

Essentially this is a way for Max OS X users to select text somewhere and then quickly append it to a text file in Dropbox. That might be a faster way, for example, to make note of things you find while web browsing. Or you might use it to add part of a PDF file to Dropbox without the extra clicks needed to create a new text document.

My Additions

I liked the tip but wanted to make a few improvements. I wanted to:

  1. Make the script work. The cat command needs two “>” in order to append instead of overwrite a file.
  2. Add date and time information to the text selection that I was appending.
  3. List the text selections in reverse chronological order, meaning that the most recent is at the top.

How to Make It

This is the Automator Service script that I used:

echo —“$(date)”— > ~/Text-Clips-temp.txt
cat >> ~/Text-Clips-temp.txt
cat ~/Dropbox/Text-Clips.txt >> ~/Text-Clips-temp.txt
mv ~/Text-Clips-temp.txt ~/Dropbox/Text-Clips.txt

Only Works in Some Applications

Unfortunately not all apps can use Automator Services. Only apps written in Cocoa, as Apple does with most of its apps, will work. This means that Safari, Mail, Preview, Calendar, and Address Book will work. Most other apps including Chrome and Firefox will not.

Side Notes

That this isn’t using the Mac OS X clipboard, as the tips I found stated. We’re selecting text and then using a service on it. The text is never copied or cut so it’s not in the clipboard.

Even though this tip is described as for Dropbox, there is nothing Dropbox specific except that the location of the text file happens to be in the Dropbox folder. Dropbox makes the service useful since you can have access to the text file from other locations. But this tip will work on any text file.

If you’re new to Dropbox, please use our Dropbox referral to set it up. It will give you an additional 250MB and give the same to us. Now Dropbox referrals will allow you to get up to 10GB for free, a great deal for your backup and sharing files needs.

What do you think?

If you have any suggestions to improve this Automator Service or to better use Dropbox, let me know.