

Tech DC has served Arlington, Alexandria, Bethesda, and Washington D.C. for over 20 years.
Unlike support from “big box geeks” that push their software and services warranties, we support your needs. We provide personalized support in the comfort of your home or office. We explain everything clearly, move at your pace, and never make you feel rushed or embarrassed to ask questions.

Testimonials
You have made me enjoy instead of fear my computer.
He spent two hours patiently teaching me everything… Now I video call my grandchildren every week.
Thanks for your help. I got so frustrated with tech support from … I’ll never go back to them. You really know what you’re doing.
- The Quiet Revolution in Media Downloading: Faster, Safer, and Simpler
 The days of downloading media through traditional peer-to-peer (P2P) file sharing are fading. Today, the “state of the art” for accessing and downloading content has moved to a faster, more secure method that happens almost entirely in the… Read more: The Quiet Revolution in Media Downloading: Faster, Safer, and Simpler
 - Why Your Gmail Sent Mail Disappears When Using Apple Mail
 Some iPhone users run into a frustrating issue: you send an email from Gmail using the built-in Apple Mail app, it briefly shows up in Sent, and then—minutes later—it moves into Trash or disappears from the Sent folder… Read more: Why Your Gmail Sent Mail Disappears When Using Apple Mail
 - Groupon’s Microsoft Office Problem: When Marketplace Vetting Fails Consumers
 A $32 “deal” raises serious questions about platform responsibility When searching Google for discounted Microsoft Office licenses, Groupon appears near the top of results. The daily deals platform has become a major marketplace for software licenses through third-party… Read more: Groupon’s Microsoft Office Problem: When Marketplace Vetting Fails Consumers
 - iOS 26 Call Features: Say Goodbye to Spam Calls and Hold Music
 If you’re tired of spam calls interrupting your day and endless hold music draining your patience, iOS 26 has arrived with two game-changing features that transform how you handle phone calls. Apple’s latest update includes Call Screening and… Read more: iOS 26 Call Features: Say Goodbye to Spam Calls and Hold Music
 - The Future in a Chart: Understanding AI Risk Before It’s Too Late
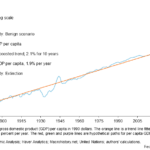 We’re living through a technological revolution that could end in utopia, normalcy, or extinction. If that sounds dramatic, consider this striking chart from the Dallas Federal Reserve that maps three wildly different futures based on how AI develops. One line… Read more: The Future in a Chart: Understanding AI Risk Before It’s Too Late