Tivo HD Hard Drive Upgrade Guide


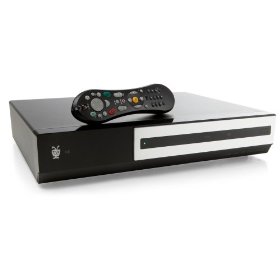
There are several Tivo hard drive upgrade guides out there.  I recently had to upgrade a Tivo HD drive for a Virginia customer and realized that most guides out there either don’t work or are unnecessarily complicated.  As a result, I’ve collected the simplest way to do it which requires just one command if you’ve got everything you need.

What you need

  1. The Tivo HD itself.  That link is to Amazon which almost always has the Tivo HD for less than $250.
  2. A new larger drive.  I recommend the Seagate DB35 750GB.  Not just any drive would do as you want to get one designed for DVRs with appropriate performance and noise levels.  That drive should yield 106 hours of HD recording.
  3. MFSLive linux boot disc.  You can download the ISO of this here: http://www.mfslive.org/download.htm.  Burn the ISO to disc.
  4. A desktop computer with 2 sata connectors and cables for the old drive and new drive.
  5. A Torx T-10 screwdriver.
What to do

  1. Remove your original Tivo drive and hook it up to your desktop’s first sata connector.
  2. Hook up the new drive to the desktop’s second sata connector.
  3. Boot off the linux boot disc.  When booted, you should just see a command prompt.  You can now type the following command to see your connected drives: 
    cat /proc/partitions
    If hooked up correctly, you should see your smaller original drive listed as sda and your new larger drive as sdb.  If you hook them up wrong, you could copy a blank drive to the original drive removing all Tivo data.  That would be very bad which is why you need to run this command and check the drives.
  4. Execute one command to begin the full copy and expansion to the new drive.  This command will copy all your settings and shows as well:
    backup -qTao – /dev/sda | restore -s 128 -r 4 -xzpi – /dev/sdb
    This command is nicer than many in that it tells you how much time is left. It should take about an hour.
  5. Once the command completes, turn off your computer and plug the new drive into your Tivo.  That’s it, boot up the Tivo and you should have a working box with much larger recording capacity.  It is a good idea to hold on to the original drive in case your new one ever breaks so you could duplicate it again to keep your Tivo working.

Computer Recycling in the D.C. Area

While we are shopping for the holidays, we should remember to recycle our old electronics. This article covers recycling information and locations for the Virginia, D.C., and Maryland area.

Dangers of Computer Waste

Old computers and monitors have harmful materials that can seep into the ground water and air if thrown in your normal trash. The cadmium and mercury in displays can damage the nervous system. Computers also may contain lead (causing birth defects and learning disabilities) and CFCs (destroying the ozone layer).

Donations

If you have a working computer, you can get rid of it through:

  1. Craigslist (Washington D.C. metro area) has sections for selling or giving away free stuff.
  2. Freecycle is a free program to give people items for reuse. They have groups everywhere, including, Washington D.C., Virginia, and Maryland.
  3. D.C. Goodwill accepts computers that are not more than 5 years old. They will not take CRT monitors, the older large monitors that have been replaced by LCDs.

Recycling Computers and eWaste

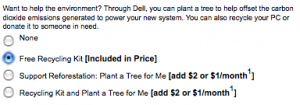
The easiest way to recycle an old computer is to do it with the purchase of a new computer. Apple, Dell, HP, Sony, Toshiba and others have a corporate recycling program that allows you to give them your old computer after buying your new computer.

This image shows the Free Recycling Kit option that Dell provides in their services customization when you buy a new computer.

Drop-off Locations for Computers and other eWaste

The EPA eCycling site is the closest thing to a definitive set of inks to eCycling programs across the country. Below are the best links I found to the D.C. area programs:

Washington D.C.

DC Free Electronic Disposal Sites:
DPW (Department of Public Works) offers free, weekly Household Hazardous Waste (HHW) and electronic recycling (e-cycling) drop-off service at the Benning Road Trash Transfer Station, 3200 Benning Road, NE, and at the Ft. Totten Trash Transfer Station, 4900 Bates Road, NE, each Saturday from 8 am to 3 pm.

Virginia

Arlington, VA HAZMAT Program:
Arlington residential households can recycle computers and other electronic items at the County’s HHM drop off sites.

Virginia Department of Environment Computers and Electronics Recycling, List of Virginia Collections Centers

Maryland

Maryland Department of Environment Electronic Recycling Collection Events and Locations:
Montgomery Country Shady Grove Transfer Station and Recycling Center

Ink Cartridges

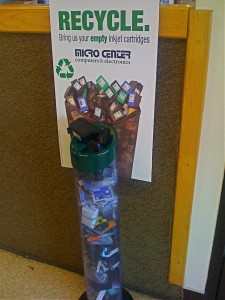
Ink cartridges can be dropped off at Micro Center in Fairfax, Virginia. Office supply stores such as Staples, Office Max, and Office Depot take used toner cartridges and sometimes even give you credit toward a store purchase for dropping them off.

Cell Phones

Cell phones can be dropped off at cell phone stores. Working phones can also be donated to women’s shelters. Unactivated phones still have the ability to call 911 so they can be useful.

Recycling Can Be Easy

With many recycling options, you can easily dispose of your electronics safely.

Please let us know if you have any corrections or additions to this post.

LCD Image Persistence

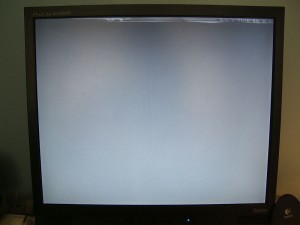
Most people have heard of screen burn-in. It is an imprint of an image on a display that is caused by that image being displayed too long. CRT burn-in was very common for things like taskbars that were always displayed on the screen in the same place. To prevent this, screen savers were invented to display different images to counteract the burn-in effects. Most people thought this problem went away when LCDs were created but that isn’t entirely true. It is uncommon in LCDs but it can happen.  The crystals change their natural state enough to cause an imprinting of the persistent image, kind of like a shadow of it.

See the LCD screen to the right which has a menu at the top that still displays on a blank screen.

Prevention

Much like CRT burn-in, screen savers can help prevent the problem.  It is a good idea to pick a screen server with lots of changing colors.  Having your screen auto turn off when not in use will also help by not displaying the image more than it has to be.

Fixing

Unfortunately, preventative techniques will only do so much if you are always at your computer and not giving it an opportunity to turn off or run a screen saver.  In that case, you need to know how to fix the problem.  It is important to try to fix it as soon as you notice it as it is possible to become permanent if it continues too long.  To fix it, you can try one of these following techniques:

  1. Leave your monitor off for very long periods of time.  This could take hours or many days.
  2. Use a screen saver with lots of colors and let it run for a long period of time.  The length of time can vary depending on how bad the persistence is.
  3. Display a solid single color or white for a long period of time.

If none of those work, your image is probably permanent and you are at your computer far too often.

Acer Aspire One running Windows Vista

The Acer Aspire One is a fun little netbook, but it’s just not fast enough to run Windows Vista. That’s why Windows XP was included instead of Vista. Right? Well, I put that to the test and found that by modifying Vista as I described earlier, Vista runs great on the Aspire One.

It actually ran more fluidly than Windows XP did. I attribute that mainly to Vista’s support of:

  1. the Atom chipset’s hyperthreading. XP Home does not take full advantage of the chipset.
  2. ReadyBoost, a Vista feature that uses a flash drive to cache and speed up random reads that would otherwise go to the hard drive.

See this video of my Aspire One showing the speed of opening several applications:

12 Ways to Speed Up and Slim Down Windows Vista

Windows Vista is a much maligned operating system, mainly because people say it:

  1. is slower than Windows XP
  2. has a silly security system requiring multiple clicks just to delete a file
  3. looks bad with all the Aero effects

While Microsoft is working to fix these and other problems in Windows 7, these problems can also be fixed today for most people by following these modifications

Note: Only make the changes that you understand and feel comfortable with. Also, if you already have a fast machine there is no need for most of these changes.

1. Turn off Windows Features

Turn off unneeded features by going to:

Start – Control Panel – Uninstall a Program (Under Programs) – Turn Windows Features on or off (on left Task panel)
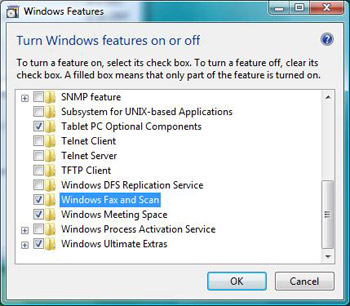
From here, you can uncheck everything you would like to. On my system, I deleted everything except:

  • Some of the games
  • XPS Viewer (under .NET Framework 3.0)
  • Remote Differential Compression (a network optimizer)
  • Windows Ultimate Extras

2. Consider Disabling Security Center

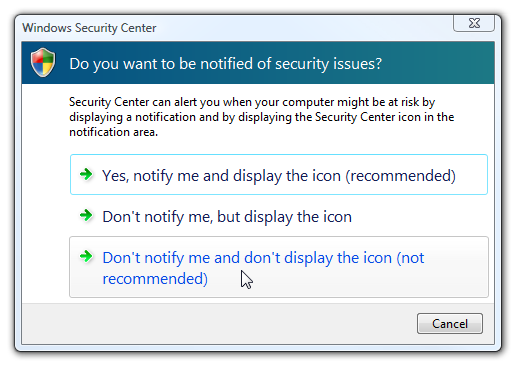
Security Center is useful, but if you have a firewall, antivirus software, and you are comfortable with the idea, you can disable the Security Center. Open the Security Center from the System Tray in the bottom right. Then click Change the way Security Center alerts me on the left pane. Then select the last option, Don’t notify me and don’t display the icon (not recommended). To finish disabling security center, follow the instructions below in services.msc.
3. Disable Services in services.msc

Services.msc shows you all the services that can run on the computer. Go to:

Start

Then type in the text area (where it says Start Search) services.msc and hit Enter

Services are under the Startup Type categories:

  • Automatic – service starts when Windows starts.
  • Manual – service starts when Windows detects that something needs it.
  • Disabled – service doesn’t start at all.

You can look for automatic services and change them to manual or disabled. Right click and choose Properties for the option to change the Startup Type. TweakHound has a Vista Services Guide listing the services and what they are used for.

This is the list of services that most people can disable:

  • Computer Browser
  • Distributed Link Tracking Client
  • IKE and AuthIP IP Keying Modules
  • Offline Files
  • Remote Registry
  • Tablet PC Input Service (unless you’re using a tablet PC)
  • Windows Error Reporting

Other services to consider diabling include:

  • DFS Replication
  • Distributed Link Tracking Client
  • IP Helper
  • IPsec Policy Agent
  • KtmRm for Distributed Transaction Coordinator
  • Secondary Logon
  • Security Center (as noted in the above Consider Disabling Security Center)
  • SSDP Discovery
  • Terminal Services
  • Windows Defender

Be sure to NOT disable:

  • Multimedia Class Scheduler
  • Plug and Play
  • Superfetch
  • Task Scheduler
  • Windows Audio
  • Windows Driver Foundation

4. Remove System Tray and msconfig items

Go to the system tray in the bottom right and remove programs that you do not need to be running, or at least remove their system tray portions if you do not need them. This is often available in the application preferences or options. You can also remove services and system tray items by typing in the start bar (where it says Start Search) msconfig and hit Enter

Each of the tabs show startup items that you can edit. There are usually items like iTunes helper, Quicktime, and AOL that are listed here. Even if you use those programs, you may not want them to start up automatically if you use those programs less frequently. They typically allow an app to start up more quickly, but at the price of always running and taking up computer resources.

5. Update your drivers

Device drivers are often updated for motherboards, chipsets, graphics. You can get a boost in performance by checking your drivers for updates. Go to:

Start – Control Panel – Hardware and Sound – View hardware and devices (under Device Manager)

From there you can right click on devices and select Update Driver Software.

6. Use ReadyBoost

ReadyBoost is a feature that uses a flash drive (thumb drive) or memory card (SD card or other) for caching data so that it does not need to be read from the hard drive. Microsoft recommends using a drive one to three times the size of the system RAM. So if you have 2GB of RAM, use a ReadyBoost flash drive of 2GB to 8GB in size.

ReadyBoost is particularly useful if you have a small amount of RAM (512MB – 1GB).

Hard drives are great for large sequential I/O. For those situations, ReadyBoost gets out of the way. ReadyBoost concentrates on improving the performance of small, random I/Os, like paging to and from disk.

7. Remove Transparency

Personally, I find the transparent bars at the top of Windows ugly. They also take up video processing resources.

Go to:
Right-click on the desktop, Personalize, Windows Color and Appearance. Uncheck Transparency

8. Stop the Sidebar

While pretty, the Sidebar takes up memory. Right-click on the sidebar, select Properties, uncheck Start Sidebar When Windows Starts. To get the sidebar back, type sidebar into the start bar.

9 . Shoot the Aero

I prefer Windows Vista Basic to the Aero visual effects. Aero also puts a heavy hit on the computer’s video resources.

To remove Aero, right-click on the desktop, select Personalize, and then Windows Color and Appearance. Click Open Classic Appearance Properties and choose a theme in the Scheme list.

10. Run occasional Defrags

Disk deframenting still helps computers that have been used for some time. But Vista is scheduled to defrag every week. You should defragment whenever you want and turn off the scheduled defrags. Type defrag into the Start area and hit Enter.

11. Turn off Anti-Virus

Yes, it’s a little dangerous. But removing antivirus software, especially standards such as Norton and McAfee will free a lot of resources.

12. Use Vista

Over time, Vista’s speed should improve as it learns how you use it, through a system called Superfetch. This takes often used files and moves them to the outer edge of the disk because the outer edge of the disk is the fastest part. Vista does this by default.