How to test Ethernet cables and WiFi speeds

I recently had to diagnose poor ethernet speeds in a home in Arlington, VA. A person was getting 60 Mbps/sec, certainly not bad, but far less than the paid for 100 Mbps/sec. The problem was first diagnosed by going to speed test websites:

http://www.speedtest.net

https://www.speakeasy.net/speedtest/

This computer had FIOS, so I plugged a testing computer I had directly into the ONT (optical network terminal, where the fiber enters the house). From there I did get 100 Mbps/sec, so I knew the culprit was within the home network. I next tested the speeds from the home router. Those speeds, over both wifi and ethernet showed the slow speeds. So the main culprit appeared to be the cable connecting the ONT to the router.

To test the cable, I used iPerf, one of my favorite speed test tools. To buy a dedicated device that tests speeds can cost in the thousands of dollars from a company like Fluke. This is because you’re essentially buying a computer to do the tests. iPerf is a free tool that just uses your computers for the testing. You need to install iPerf on two computers and run one in client and one in server mode.

I used iPerf to test that suspect cable and got the following results:

iPerf output showing 100 Mbits/sec speed capability of cable
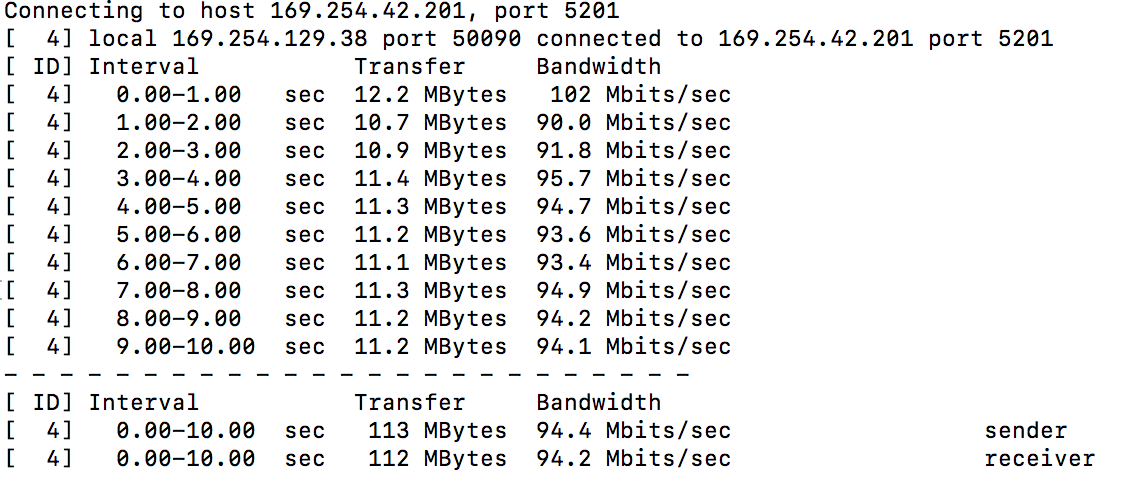
A good cable should get 10x this speed. So I re-terminated one of the cable ends to see if that would fix the cable. I couldn’t easily replace the cable since it took a difficult path through a wall. Happily fixing one end of the cable gave me the following iPerf results:

iPerf results showing gigabit speeds

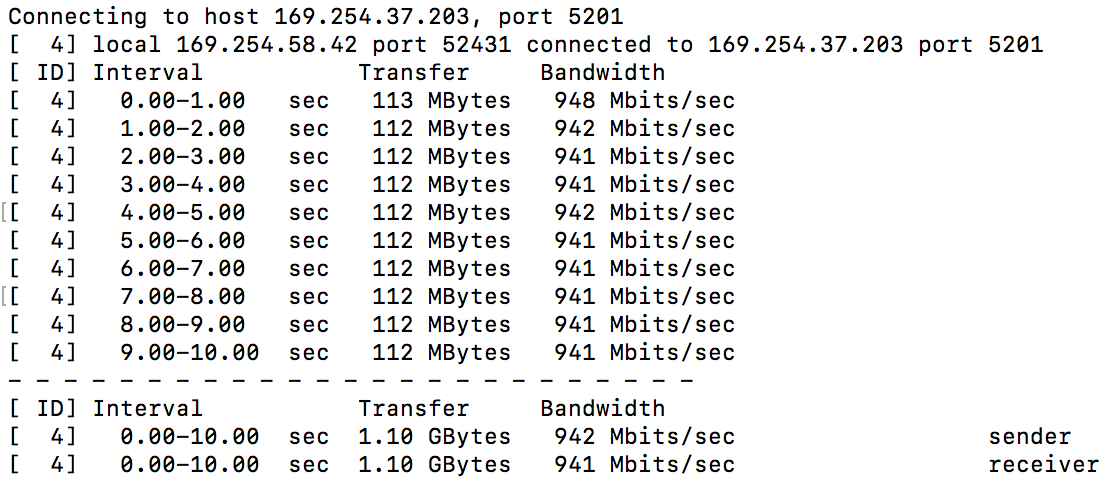
This is what an operational cable’s results look like, showing gigabit speeds.

I next tested other ethernet jacks and the WiFi using iPerf and everything else checked out.

Unfortunately, this kind of testing isn’t widely performed. Most people don’t noticed degraded speeds in the first place. And if they do notice, they don’t know where to start to figure out the problem. Comcast and Verizon don’t normally perform this level of testing in my experience. Once the internet providers see good speeds getting to the house, they let the users deal with local network issues.

Adding iTunes Next Track Keyboard Shortcut for Logitech Easy-Switch Bluetooth Keyboard

The new Logitech Easy-Switch Keyboard for the Mac is an awesome keyboard.  It has a big advantage of 3 keys that quickly connect to 3 different Mac or iOS devices.  You can put your Mac on button 1, iPad on button 2 and iPhone on button 3.  Just one press and you’re ready to type on the device.  Unfortunately, to have these 3 buttons, the iTunes next track and previous track buttons aren’t there like on Apple keyboards.  I use those all the time and its just not the same having to take your hands off the keyboard and mouse over to iTunes to click next.  Fortunately, the Mac has the ability to define new keyboard shortcuts.

Step 1 – Create a new Service for iTunes Next Track via automator

Launch the Automator app and create a new Service.  In that service, Run AppleScript and select no input for what the service receives.  The AppleScript tells iTunes to go to the next track.  Save the service as iTunes Next Track.  You can create a new service and do the same for iTunes Previous Track.  It is exactly the same process except change the AppleScript “next track” to “previous track”.

Step 2 – Define the Keyboard Shortcut

Your new Services should appear under Keyboard Shortcuts in System Preferences.  They are at the bottom of the Services list.  Here you can select the shortcut and then enter the keyboard shortcut you want to use.  In my case, I chose to use “option command =” because the = key also has a + on it so + to go next track and – to go previous track.  You must choose this shortcut wisely or it may not work.  If an app that has focus has the same shortcut, it will overrule this one so you need to choose something that doesn’t seem present in the apps you are using.  That’s part of why I had to use “option command” because just one of those with = is already in use in some programs I use.

Fortunately, the play/pause and volume buttons are still there so those don’t need to be re-created on the Logitech Easy-Switch Keyboard.  Even though I now have to hit 3 keys at once instead of just the next button, the Logitech Easy-Switch Keyboard is the best wireless keyboard for the Mac.


WiFi Scanner for Mac

There’s a decent WiFi scanning tool built into Mac OS X Mountain Lion. This can be helpful when trying to diagnose interference issues based on channels and signal strength. It’s a bit tricky to find. Go to your hard drive, then the following folders:
System – Library – CoreServices

Then click on the app “WiFi Diagnostics”. Then a window pops up to help you create a diagnostic report. I ignore that and just click on the top menu:
View – WiFi Scan

Then you’ll see this handy program:

Wi-Fi Scanner Mountain Lion

If you use this program a lot, you can drag it to the desktop or your Applications or Utilities folder.